Achieving a masterful bronze patina isn’t about finding the right recipe; it’s about mastering the subtle alchemical dialogue between heat, chemistry, and timing.
- Success hinges on precise temperature control, not just applying heat, to prevent immediate flaking and ensure chemical bonds.
- Complex colors are born from strategic layering and neutralization, avoiding the “cancellation effect” that ruins hours of work.
Recommendation: Abandon the rigid recipe-follower mindset. Instead, learn to read the metal’s cues—the sound, the color, the feel—to guide your hand and create a truly living finish.
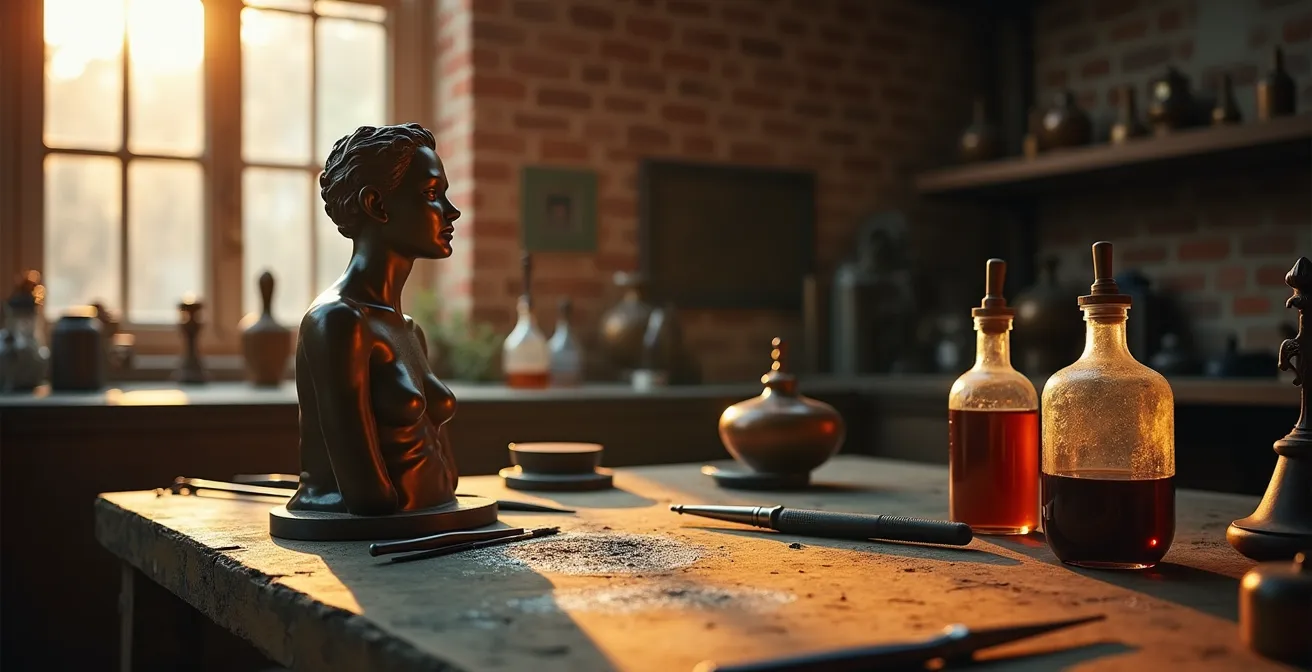
For any foundry artisan, the moment of patination is the breath of life for a sculpture. It’s the final, transformative act that turns raw metal into a story of age, weather, and character. Yet, this moment is fraught with peril. We’ve all seen it: the perfect cast, ruined by a patina that flakes off like sunburnt skin, turns a muddy, uniform black, or worse, erupts in a cancerous green powder. The internet is filled with simple recipes, lists of chemicals that promise an instant “Renaissance Brown” or a classic verdigris.
These guides often treat the process like baking a cake: mix A with B, apply to C, and wait. But this is where the craft ends and disaster begins. They gloss over the critical, unspoken truths of the trade. They fail to mention the subtle errors in temperature that doom the project from the first touch of the torch, or the catastrophic layering mistakes that cause a beautiful green to revert to black months later. They treat patination as a technical process, when in reality, it is an alchemical one.
But what if the key wasn’t in the recipe, but in the dialogue? This guide abandons the simplistic formula. We will delve into the alchemy of patination, focusing not on what to do, but on understanding the “why” behind each reaction. We will explore the critical importance of temperature control, the secrets of chemical layering, the insidious nature of contamination, and the precise moment to seal your work, turning potential failure into a masterpiece. This is not a list of steps; it is a grimoire for the modern bronze alchemist.
This article deciphers the subtle art and precise science of bronze patination. To navigate this complex world, the following sections will illuminate the critical failure points and the master techniques required to overcome them, ensuring your work achieves the timeless beauty it deserves.
Contents: The Alchemist’s Grimoire for Bronze Patination
- Why your patina flakes off: the importance of torch temperature control
- How to layer cupric nitrate over liver of sulfur for a complex green-black?
- Torch Application vs. Cold Burial: Which creates a more authentic antique look?
- The chloride contamination error that turns your sculpture into green powder
- When to apply the wax: recognizing the exact moment the chemical reaction is done?
- The layering mistake that turns copper-based greens black over time
- The shrinkage porosity error that ruins the patina application
- How to Clean Lichen Off a Limestone Statue Without Eating Away the Surface?
Why your patina flakes off: the importance of torch temperature control
The most common and soul-crushing failure in hot patination is flaking, or spalling. The beautiful, rich color you just created lifts off the surface in brittle sheets, revealing raw metal beneath. The culprit is almost never the chemical; it is the alchemist’s heavy hand with the torch. You are not cooking the metal; you are coaxing it. Excessive heat doesn’t bond the patina, it boils the chemical solution on contact, creating a fragile, unattached crust instead of an integrated surface conversion.
The goal is a surface temperature of approximately 200°F (93°C). Professional artisans know the secret isn’t a pyrometer, but the “temperature’s whisper.” You must learn to listen. Sprinkle a few drops of distilled water onto the heated surface. If it balls up and skitters away like a drop of mercury, it’s too hot. If it just sits there and slowly evaporates, it’s too cold. You are seeking the perfect moment where the water steams away with a gentle ‘hiss’, not a violent ‘spitting’ crackle. This is the sound of the metal being receptive.
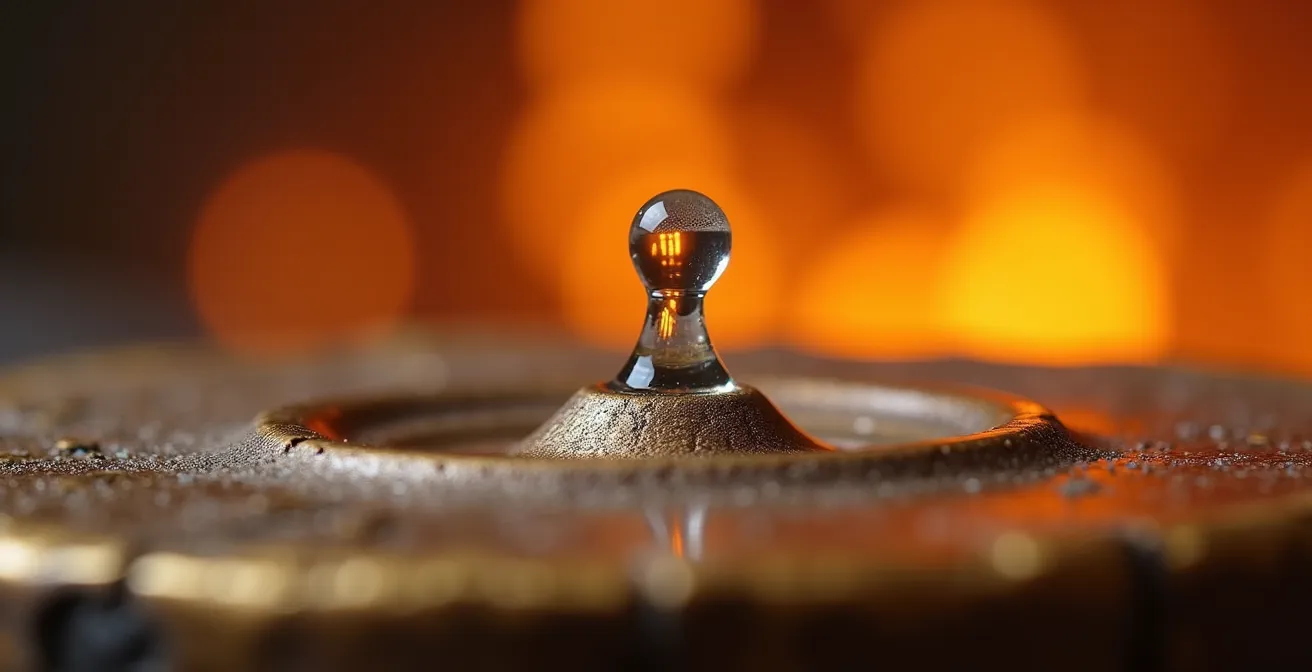
As this image perfectly illustrates, the ideal reaction is a soft steam, indicating the bronze is ready to accept the chemical wash. To achieve this, your torch must be in constant, sweeping motion. Never let the flame linger on one spot. A hot spot is a point of failure, a place where the chemical bond will be weakest. Master patina artists maintain their solutions at a consistent 180-190°F and apply them to metal held at that magical 200°F threshold, ensuring the chemical reaction is a gentle fusion, not a violent rejection.
How to layer cupric nitrate over liver of sulfur for a complex green-black?
Creating a patina with depth and complexity, like a rich green-black, is an act of chemical choreography. It’s not about mixing colors, but about layering reactions. The two key players in this dance are liver of sulfur (which yields deep brown-black copper sulfides) and cupric nitrate (which produces vibrant blue-greens). Applying them in the wrong order or without the right timing leads to the dreaded “cancellation effect,” where the chemicals neutralize each other into a muddy, indistinct mess.
The secret is to build a stable foundation first. The process begins by applying a weak liver of sulfur solution to the heated bronze. This creates the initial, foundational layer of copper sulfide (CuS), a rich black that adheres strongly to the metal. This is your canvas. The most critical step follows: you must allow this black layer to fully set and the metal to cool completely to room temperature. Rushing this stage is a common mistake; applying the next layer to a still-reacting surface will disrupt the sulfide formation.
Once the piece is cool to the touch, you can begin the artful application of a diluted cupric nitrate solution. This should be done with a brush or a fine spray, not to cover the black, but to dance upon it. The goal is a partial reaction. You can create intricate, lace-like patterns by letting the underlying black show through the emerging green. The ultimate control comes from using a spray bottle of distilled water to strategically “freeze” the reaction at the precise moment you achieve the desired hue, allowing for an unparalleled level of detail and complexity.
Torch Application vs. Cold Burial: Which creates a more authentic antique look?
The debate between hot (torch) and cold (natural) patination often presents a false dichotomy. Hot patinas offer speed and control, allowing an artist to create a spectrum of colors in hours by precisely altering the surface oxide layers. However, this method demands immense skill, as even a moment of excessive heat can irrevocably damage the bronze, leading to a sterile, “cooked” appearance that lacks the soul of a true antique.
Cold patinas, on the other hand, are the embodiment of patience. Achieved through burial in damp sawdust, exposure to ammonia fumes, or simply the slow passage of time and moisture, they are incomparably durable and possess an organic authenticity that is difficult to replicate with a torch. Their colors grow from within the metal’s structure. However, they are slow, unpredictable, and offer far less control over the final pattern and hue. For the artisan seeking a living finish, waiting months for a result is often not practical.
The true masterstroke lies not in choosing one method, but in combining them. Professional studios often employ a hybrid method to achieve the pinnacle of realism. They begin by establishing a deep, uniform base color using a slow cold patina process. This creates a foundation of unparalleled depth and durability. Then, with the base established, they use a torch with very dilute chemical solutions to selectively highlight raised areas, add subtle warmth, or introduce contrasting tones. This approach marries the authenticity of a natural patina with the artistic control of a hot application, achieving the best of both worlds and a finish that feels both created and earned by time.
The chloride contamination error that turns your sculpture into green powder
There is patina, and then there is poison. The most insidious enemy of a bronze sculpture is not a failed aesthetic choice, but a chemical cancer known as “bronze disease.” It manifests as light, powdery, almost neon-green spots that, unlike a stable patina, will eat away at the metal. This is not a patina; it is active corrosion caused by the presence of chlorides reacting with moisture. It will spread, pit the surface, and ultimately turn your artwork to dust. This is why buildings in damp coastal environments develop surface layers so differently due to airborne salt content.
Chloride contamination can come from many sources: tap water (use only distilled water for your solutions and rinses), contaminated abrasives, or even the salts from an ungloved hand. Once it begins, it is a self-catalyzing reaction that must be stopped immediately and decisively. Simply scrubbing it off is not enough; the corrosion is already in the pores of the metal and will return.
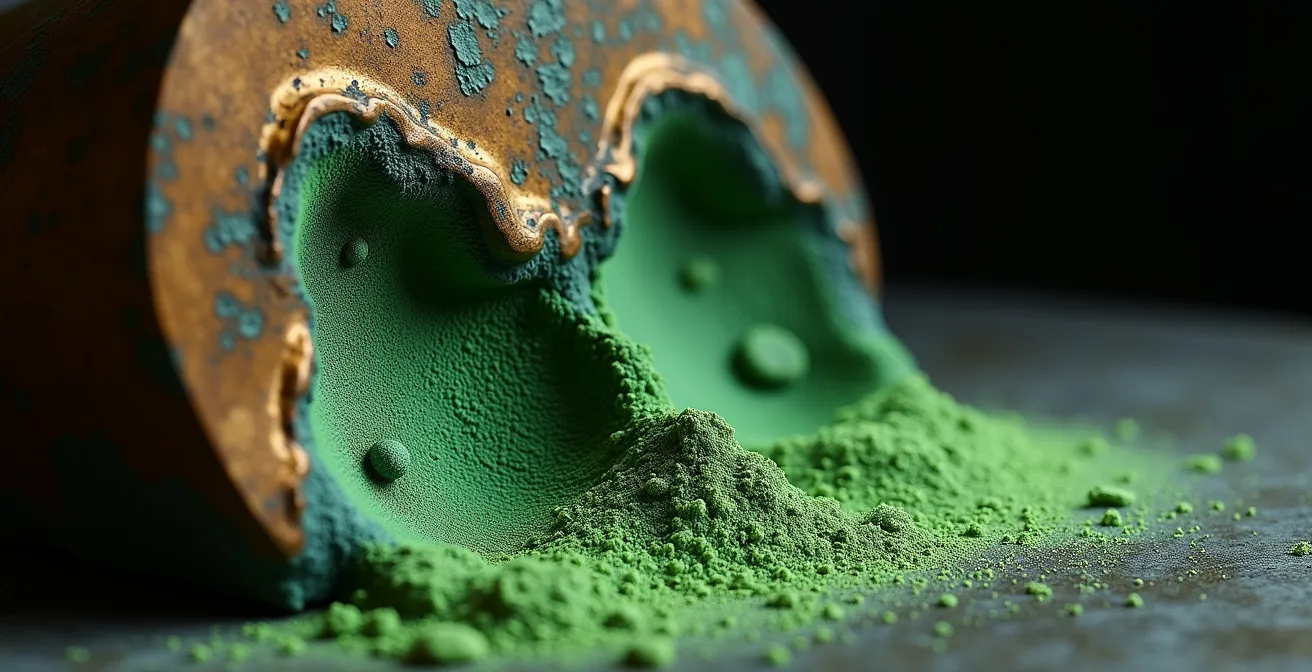
The sight of this bright green powder is a call to emergency action. The contaminated area must be chemically stabilized to halt the destructive cycle. This involves a meticulous process of mechanical removal followed by chemical treatment to neutralize the chlorides. Ignoring this threat is not an option; it is the difference between conservation and disintegration.
Action plan: Emergency Bronze Disease Stabilization Protocol
- Isolate & Remove: Gently remove all visible green powder using only soft brushes and wooden or plastic tools to avoid scratching the healthy patina.
- Assess Contamination: Identify the full extent of the problem. Look for any bright green, powdery, or fuzzy areas that indicate active corrosion.
- Prepare Neutralizer: Create a 5% solution of sodium sesquicarbonate in distilled water. This is your primary weapon against the chlorides.
- Apply Treatment: Soak the affected areas directly or apply the solution locally with cotton swabs. Let it sit for 24-48 hours to draw out and neutralize the chlorides.
- Final Rinse & Dry: Rinse the area thoroughly with fresh distilled water to remove all traces of the treatment solution, then dry the sculpture completely to remove the moisture that fuels the reaction.
When to apply the wax: recognizing the exact moment the chemical reaction is done?
The final act of patination is sealing the work with wax. This step is not merely for shine; it is a crucial act of preservation. The wax layer protects the delicate, porous chemical layer from moisture, oxygen, and contaminants, effectively “arresting the reaction” and locking in the color you so painstakingly achieved. Apply it too early, and you trap moisture and active chemicals, leading to cloudy spots or continued, unwanted color changes. Apply it too late, and the unprotected patina can be damaged. The timing is an art in itself.
A patina is not a coat of paint; it is a living chemical surface that continues to develop for some time after the last application. Master artisans know that the most important ingredient in this final stage is patience. According to professional techniques for creating patinas, the surface must be allowed to dry and cure thoroughly, a process that can take from several days up to two weeks, until there is absolutely no more perceptible change in the surface color or texture.
So how do you recognize that perfect moment? It requires engaging senses beyond sight. A wax-ready patina has a uniform, matte finish with no residual wet sheen. It should have no lingering chemical odor. A drop of distilled water will bead up on the surface, not soak in or alter the color. For a hot wax application, the metal should be gently warmed to around 150°F (65°C), just warm enough to melt the wax and allow it to penetrate the patina’s micro-pores deeply. This creates an incredibly durable, integrated seal. Rushing to wax is a novice’s error; a true alchemist knows when to wait and let the chemistry complete its quiet work.
The layering mistake that turns copper-based greens black over time
You’ve created a stunning, vibrant green patina using cupric nitrate. Weeks or months later, you notice with horror that it is slowly, inexplicably darkening, reverting to the dull black of copper sulfide. This heartbreaking phenomenon is a classic case of chemical reversion, a subtle but catastrophic layering mistake. It occurs when a nitrate-based patina (green) is applied over a sulfide-based patina (black) without proper neutralization between the layers.
Even after rinsing, residual sulfur compounds from the liver of sulfur application can remain on the metal’s surface. When you apply the cupric nitrate, you may get an initial beautiful green, but this “un-neutralized” sulfur is a chemical time bomb. Over time, it will continue to react slowly with the copper in the bronze, converting the delicate green copper nitrate compounds back into black copper sulfide. The very foundation you built is now consuming your work from beneath.
The only way to prevent this is through a meticulous neutralization step. After applying and rinsing your initial sulfide layer, you must introduce a mild acid to completely eliminate any remaining active sulfur compounds. According to patina formulas from specialty suppliers, a critical neutralizing rinse is essential. This is typically done with a weak solution of white vinegar and distilled water (a 1:20 ratio is a safe starting point). This acidic rinse must be applied systematically across the entire surface and then, crucially, be followed by another thorough rinse with pure distilled water to remove all traces of the acid. Using pH litmus paper to test for a neutral surface before applying the green layer is the final guarantee of success.
Key Takeaways
- Patina is a controlled chemical dialogue, not a paint-by-numbers recipe; success lies in reading the metal’s response.
- Temperature is paramount: a surface that is too hot will cause the patina to flake, while one that is too cold will not react properly.
- Contamination is the enemy: use distilled water and impeccable cleanliness to prevent “bronze disease,” an active corrosion that destroys metal.
The shrinkage porosity error that ruins the patina application
Sometimes, the fault lies not in your chemicals or your technique, but in the very metal you are working with. The most frustrating surface to patina is one marred by shrinkage porosity. This is a casting defect where tiny, interconnected voids form within the metal as it cools, creating a micro-sponge-like texture just below the surface. To the naked eye, the surface may look perfect after grinding and finishing, but this defect is a hidden betrayal waiting to happen.
When you apply patina chemicals, these porous zones soak them up like a sponge. As noted by experienced metal artists, this leads to uncontrollable and unpredictable results. The trapped chemicals can “bleed” back out to the surface hours or even days later, creating ugly, dark spots and streaks that are impossible to control. No amount of careful application can fix a surface that is structurally compromised. Proper surface preparation is not just about cleaning; it’s about diagnosing the integrity of the metal itself.
Detecting porosity before you begin is critical. You can test for it by brushing acetone onto the finished surface. On solid metal, the acetone will evaporate quickly and evenly. In porous areas, it will soak in and the spot will remain dark and “wet” noticeably longer than the surrounding metal. Once you’ve identified these problem zones, you must seal them before any patination begins. This is typically done by applying a thin layer of a penetrating epoxy sealer or a specialized shellac for metal, wiping back the excess so that only the pores are filled. After a light sanding to level the surface, the metal is finally ready for a uniform and predictable chemical reaction.
How to Clean Lichen Off a Limestone Statue Without Eating Away the Surface?
The alchemist’s knowledge extends beyond creation to preservation. A bronze sculpture is often paired with a stone base, and its care is just as critical. Cleaning lichen or biological growth off porous limestone is a delicate operation where the wrong choice can cause irreversible damage. The primary rule is to do no harm. Using common cleaners like bleach or vinegar, or aggressive methods like pressure washing, is a death sentence for limestone. These methods are so destructive that professional conservators report that acid-based cleaners can begin to dissolve the calcite in the stone within hours.
Limestone is soft and chemically sensitive. Pressure washing will cause spalling, blasting away the surface layer of the stone. Acids, even weak household ones, will react with the calcium carbonate in the stone, literally eating it away. The correct approach is a multi-phase process that is both gentle and effective, focusing on killing the organism at its root rather than just scrubbing it from the surface.
The professional standard involves six distinct phases. First, the bulk of the lichen is gently removed with non-metallic tools like wooden or plastic scrapers. Second, a pH-neutral architectural biocide (like D/2 Biological Solution, a widely-used conservation product) is applied to the surface. Third, this biocide is allowed to dwell for 24-48 hours, killing the organism down to its roots within the stone’s pores. Fourth, the statue is rinsed with low-pressure water—nothing more powerful than a standard garden hose. Fifth, soft, natural bristle brushes are used to gently scrub away the now-dead organic matter. Finally, the stone must be monitored over the following months for any signs of regrowth. This patient, scientific approach ensures the preservation of the stone for decades to come.
By moving beyond simple recipes and embracing this alchemical dialogue with your materials, you transform from a technician into a true artist. Each piece becomes a collaboration between your intent and the metal’s inherent nature, resulting in a finish that is not merely applied, but truly alive. The next time you pick up your torch, do so not to command, but to listen.