The single most effective way to lower foundry costs is not by haggling over the final price, but by making strategic, technically-informed decisions during pre-production.
- Simplifying undercuts and perfecting your wax chasing can eliminate the most significant and expensive foundry labor costs.
- Inspecting the raw cast for porosity yourself prevents catastrophic rework and ensures a flawless patina application.
Recommendation: Use this guide’s technical insights to analyze your next sculpture *before* you approach the foundry to build a cost-effective production plan and negotiate from a position of strength.
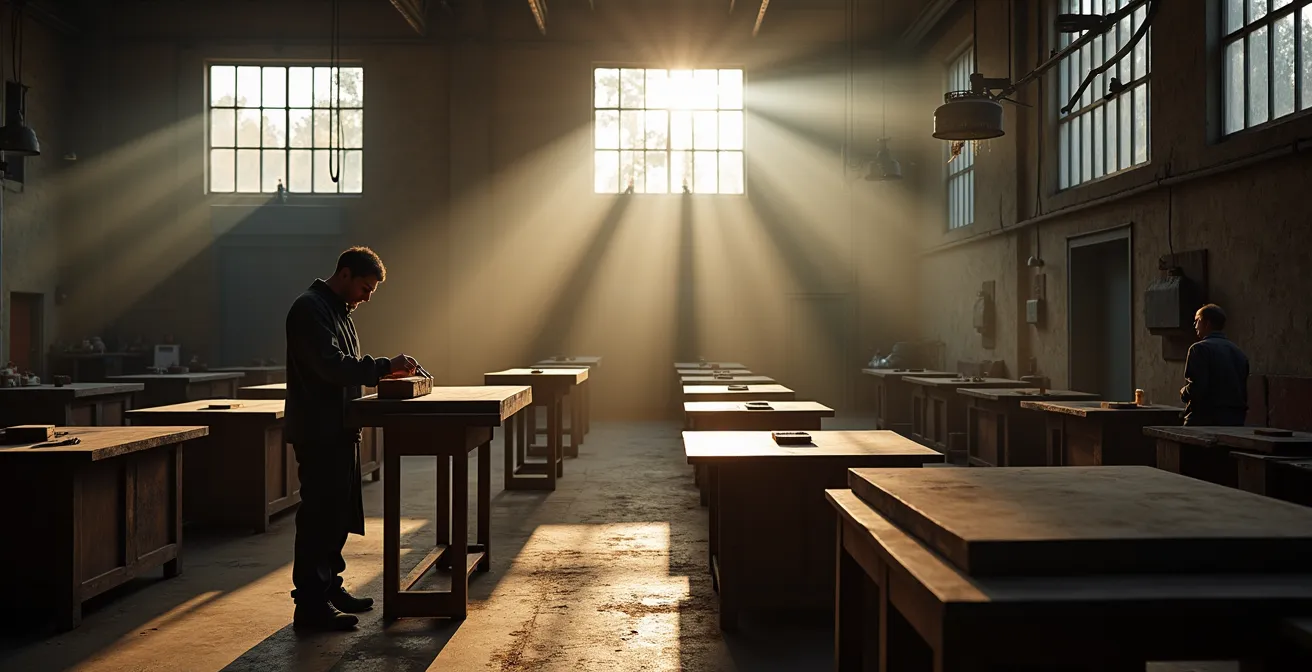
For any sculptor, the foundry quote can feel like a black box. You submit your masterwork, and a number comes back—often higher than anticipated. The default reaction is to negotiate the price down, seek multiple quotes, or worse, compromise the work by making it smaller or switching to a lesser material. This approach, however, misses the fundamental truth of foundry work: the final price is not arbitrary. It’s a direct reflection of labor hours, material usage, and process complexity.
The common advice to “simplify your design” is frustratingly vague. True cost control isn’t about artistic compromise; it’s about gaining technical leverage. It’s about understanding the “why” behind the costs—the principles of Design for Manufacturability (DfM) as they apply to art. By mastering a few key pre-production stages, you can strategically eliminate the most expensive and time-consuming tasks from the foundry’s workflow. This doesn’t just lower the price; it transforms your relationship with the foundry from a simple client to a knowledgeable partner.
This guide demystifies the process. It will not advise you to shrink your vision. Instead, it will equip you with the technical knowledge to pinpoint and mitigate the biggest cost drivers in bronze casting. We will explore how your decisions regarding undercuts, wax chasing, casting methods, and quality inspection directly impact the final invoice. By investing your own skill and knowledge upstream, you can achieve significant savings downstream, all while ensuring the final cast is a perfect, uncompromised execution of your artistic intent.
This article breaks down the key technical areas where you, the artist, can exert the most influence over the final cost. The following sections provide a roadmap for intelligent negotiation and cost-effective production.
Summary: A Sculptor’s Technical Guide to Foundry Cost Reduction
- Why the complexity of undercuts doubles your silicone mold budget?
- How to chase wax perfectly to save 10 hours of metal chasing later?
- Lost Wax vs. Sand Casting: Which yields the texture you actually want?
- The shrinkage porosity error that ruins the patina application
- When to approve the wax proof to guarantee delivery for a gallery opening?
- How to layer cupric nitrate over liver of sulfur for a complex green-black?
- Cast Stone vs. Carved Stone: Which holds sharp detail better after 20 years outdoors?
- How to Achieve a “Renaissance Brown” Patina on New Bronze Safely?
Why the complexity of undercuts doubles your silicone mold budget?
The first major cost in any bronze edition is not the metal itself, but the creation of the master silicone mold. An undercut is any protrusion or indentation in your sculpture that prevents the mold from being pulled away in a single, straight line. Think of a figure with a bent arm creating a gap between the arm and the torso. While artistically necessary, each undercut dramatically increases the mold’s complexity. Instead of a simple two-part mold, the foundry must engineer a multi-part puzzle of smaller, interlocking silicone pieces, each designed to capture a specific negative space.
This complexity has a direct and exponential impact on cost. More parts mean significantly more labor for the mold maker in planning, cutting, and keying the mold. It also increases the risk of mold tearing during de-molding the wax, potentially shortening the mold’s lifespan for an edition. The financial implications are staggering; analysis shows that each undercut can add $1,500 to $10,000 to the tooling cost, depending on its complexity. While you should never sacrifice a key feature, reviewing your piece for “unintentional” or minor undercuts that could be softened or adjusted can yield the single biggest cost saving in the entire process. This is the essence of Design for Manufacturability applied to sculpture.
Before committing to a final form, ask your foundry to perform a “draft analysis.” This involves examining the piece to identify all areas of negative draft (undercuts). A small adjustment to an angle or a slight filling of a crevice, made at the master stage, can sometimes transform a complex four-part mold into a simpler two-part one, cutting the mold budget significantly without any discernible impact on the final artwork’s aesthetic.
How to chase wax perfectly to save 10 hours of metal chasing later?
After the mold is made, the foundry creates a hollow wax replica of your sculpture. This wax positive is a critical, and often underestimated, stage for cost control. Every seam line from the mold parts, every tiny air bubble, and every surface imperfection present in the wax will be perfectly replicated in the final bronze. Removing these flaws from metal is a difficult, noisy, and time-consuming process called metal chasing. Foundries typically charge for this highly skilled labor, with rates that can easily exceed $100 per hour. Herein lies a powerful opportunity for what can be called “Labor Arbitrage.”
By investing your own time in “wax chasing,” you can directly reduce the foundry’s billable hours. Chasing wax is a quiet, clean process that you can do in your own studio. It involves using heated dental tools to seamlessly fill and blend seam lines, and solvents like denatured alcohol to smooth surfaces. A perfectly chased wax, free of all flaws, results in a bronze casting that requires minimal metal chasing. An hour spent refining the wax can easily save two to three hours of grinding, filing, and sanding on the final bronze.
This is where your skill as a sculptor provides direct financial leverage. The image below shows the meticulous nature of this work, where specialized tools are used to refine the wax surface to a flawless finish before it ever enters the casting process. Approving a wax that is anything less than perfect is, in essence, pre-authorizing hours of expensive metalwork.
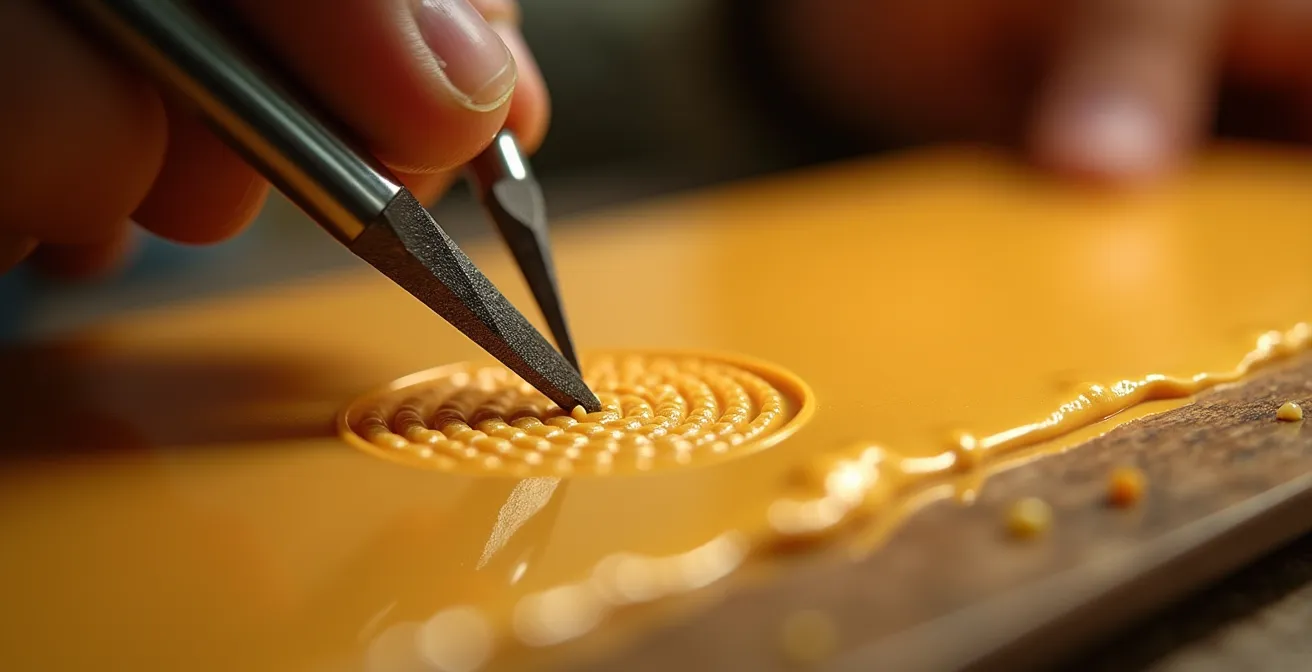
As a case study from a detailed casting tutorial demonstrates, toolmakers spend dozens of hours hand-polishing metal molds to achieve a perfect finish. The same principle applies here: time invested in preparing the positive (the wax) prevents costly finishing work later. Communicate with your foundry; let them know you will deliver a “chase-ready” wax, and ensure this is reflected in the quote for the finishing stage.
Lost Wax vs. Sand Casting: Which yields the texture you actually want?
The term “bronze casting” is not monolithic; the method used has a profound effect on both the final cost and the aesthetic outcome, particularly surface texture and detail. For sculptors, the primary choice is between Lost Wax (investment) casting and Sand Casting. Understanding the trade-offs is crucial for aligning your budget with your artistic intent, rather than just choosing what seems cheapest.
Lost wax casting is the standard for fine art sculpture for a reason: it captures fingerprint-level detail. It uses a ceramic shell built around the wax positive, which is then melted out. This process yields a smooth, refined surface that is a near-perfect replica of the wax. However, it is a multi-step, labor-intensive process, making it more expensive, especially for very large, simple forms. Conversely, sand casting is faster and cheaper. It involves pressing the master pattern into a specialized sand mixture to create the mold. It is ideal for large, monumental pieces with simpler geometry, but it cannot capture fine detail and inherently produces a rough, granular surface texture.
The following table breaks down the key differences, helping you decide which process delivers the material integrity and finish your work demands. For some artists, the raw, brutalist texture of a sand cast is the desired aesthetic. For others, it would be a disaster. Choosing the right process is an artistic decision first and a financial one second.
| Aspect | Lost Wax Casting | Sand Casting |
|---|---|---|
| Detail Retention | Exceptional – captures fingerprint-level detail | Moderate – not suitable for high details |
| Surface Texture | Smooth, refined finish possible | Inherently rough, raw texture |
| Mold Reusability | Silicone master mold lasts 50+ castings | Mold destroyed after single use |
| Cost for Large Pieces | Higher due to complex mold process | Lower – shortened mold making process |
| Edition Viability | Excellent for multiple editions | Poor – requires new mold each time |
A hybrid strategy is also emerging with modern technology. For certain geometric forms, a technique known as Digital Direct Casting can be used, which 3D prints the ceramic shell directly from a digital file, bypassing the wax stage entirely. This is not suitable for all forms, but for the right project, it can offer significant savings. According to one foundry’s analysis, artists who can utilize Digital Direct casting can save up to 25% compared to traditional lost wax methods. Discuss this possibility with your foundry if you work from digital models.
The shrinkage porosity error that ruins the patina application
Perhaps the most insidious and costly defect in a bronze cast is one you may not even see until the very end: shrinkage porosity. As molten bronze cools and solidifies in the mold, it shrinks. If the foundry’s gating and venting system (the channels that allow metal to flow in and gases to escape) is not perfectly designed, this shrinkage can create tiny, interconnected voids just below the surface of the metal. To the naked eye, the raw casting might look fine. But these microscopic, sponge-like areas are a time bomb waiting to ruin your patina.
When you or the foundry applies the patina chemicals, these porous areas will absorb the solution unevenly, resulting in ugly, splotchy, or discolored patches that are impossible to fix. The only remedy is to completely strip the patina, sandblast the entire sculpture, and start over—a process that can double the labor costs for finishing. A comprehensive foundry cost analysis confirms that undetected quality issues like porosity are a primary driver of budget overruns, as the cost of rework far exceeds the cost of getting it right the first time.
As the artist, you are the final quality control checkpoint. Before any finishing work begins, you must inspect the raw, sandblasted casting for any signs of porosity. This requires more than a casual glance. It involves careful, systematic inspection, often with magnification and angled light, to spot subtle surface irregularities. Identifying these porosity hotspots early allows for them to be addressed (for example, by TIG welding) before the costly patina process begins.
Your checklist for inspecting a raw casting
- Magnify and Light: Use a magnifying glass and a strong, angled light source to meticulously scan the entire surface for any subtle pitting or a “spongy” texture.
- Check Junctions: Pay special attention to areas where thick sections of the sculpture meet thin sections. These are the most common locations for porosity to occur due to uneven cooling.
- Verify Wall Thickness: Discuss the casting with the foundry. Ask if the wall thickness is uniform, as this helps prevent “hot spots” that lead to shrinkage problems during the pour.
- Look for Discoloration: Even on the raw metal, sometimes porous areas will have a slightly different color or sheen. Trust your eye.
- Document and Discuss: Photograph any suspicious areas and discuss them with the foundry manager immediately, before approving the piece for patina application.
When to approve the wax proof to guarantee delivery for a gallery opening?
In the world of fine art, deadlines are not suggestions—they are contractual obligations tied to gallery openings, client commitments, and shipping schedules. A common and costly mistake is underestimating the bronze casting timeline and then being forced to pay exorbitant rush fees to meet a deadline. Understanding the standard production schedule gives you timeline leverage and allows you to plan backward effectively, avoiding unnecessary costs.
The wax proof is your last, best chance to make changes before the piece is committed to an irreversible and expensive process. This is the moment of final approval. However, your approval also acts as the starting gun for the longest phase of the process: creating the ceramic shell and casting the metal. As the accompanying image suggests, this is a moment for meticulous review and documentation. A hasty approval on a flawed wax will lead to a flawed bronze, while a delayed approval can jeopardize your entire schedule.
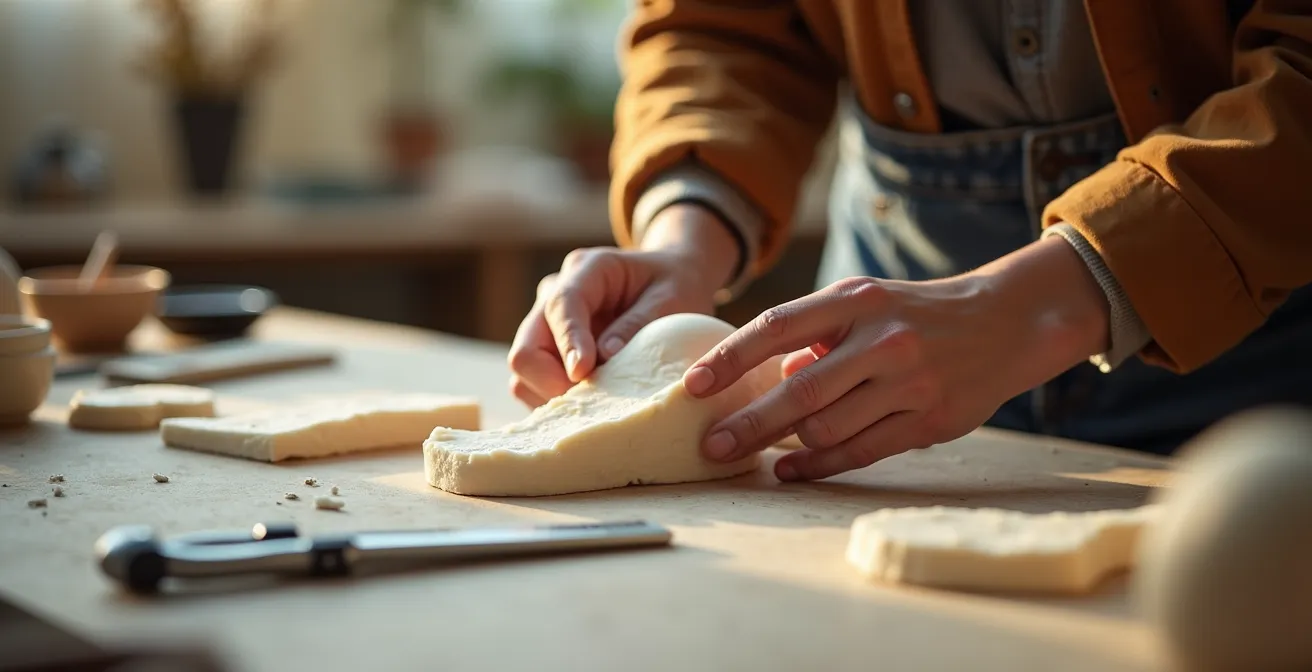
Foundries are complex manufacturing environments juggling multiple projects. Squeezing your project in ahead of others requires overtime and process disruption, and they will charge a significant premium for it. Approving your wax proof with a clear understanding of the subsequent timeline is key. If your gallery opening is in four months, you need to be approving your wax *now*, not in six weeks.
The table below, based on typical foundry timelines, illustrates how quickly costs can escalate when a standard schedule is compressed. A rush job on mold making or metal casting can easily double the cost of that stage. By planning ahead and approving the wax with ample time, you ensure a standard, more affordable production slot.
This data from a foundry guide provides a stark visualization of the financial impact of poor planning. Use it to build a realistic timeline with your foundry from day one, locking in standard rates.
| Process Stage | Standard Timeline | Rush Timeline | Cost Impact |
|---|---|---|---|
| Mold Making | 3-4 weeks | 1-2 weeks | +100% rush fee |
| Wax Work & Approval | 1 week | 2-3 days | +50% rush fee |
| Metal Casting | 6-8 weeks | 3-4 weeks | +50-75% rush fee |
| Chasing & Finishing | 2 weeks | 1 week | +25% rush fee |
| Patina Application | 1 week | 3 days | Standard rate |
How to layer cupric nitrate over liver of sulfur for a complex green-black?
Achieving a deep, complex, and nuanced patina is the final step in bringing a bronze sculpture to life. It is a process of controlled oxidation, a delicate chemistry that requires both technical knowledge and artistic sensitivity. One of the most sought-after effects is a rich, mottled green-black, which is not achieved with a single chemical but through careful layering. The key is to build a foundation with one chemical and then apply a second to react with both the bronze and the initial layer.
The process for a complex green-black typically involves a hot application of Liver of Sulfur (potassium polysulfide) as a base, followed by a strategic application of Cupric Nitrate. The Liver of Sulfur creates a dark, copper sulfide foundation on the bronze. The subsequent layers of cupric nitrate then react differently depending on temperature and application technique, creating a range of greens and blues that sit on top of the black base. It’s a dance between heat, chemistry, and timing.
Mastering this technique requires a systematic approach. The goal is to build up translucent layers of color, not to apply one opaque coat. Between each light application, the surface is often gently burnished with 0000 grade steel wool, which knocks back the high points of the new layer, revealing the darker base underneath and creating incredible depth. A tutorial on bronze casting highlights that temperature control is a critical variable; hot applications create fast, uniform reactions, while cold applications allow for slower, more deliberate mottling effects. The final patina is fragile until sealed with wax or lacquer, which locks in the color and protects the surface.
Cast Stone vs. Carved Stone: Which holds sharp detail better after 20 years outdoors?
For sculptors creating work for outdoor settings, material choice is not just about initial aesthetics but about long-term durability. While bronze is a gold standard, cost can be a factor, leading many to consider stone. Here, a critical choice emerges: cast stone versus carved natural stone. While cast stone offers a lower initial cost and the ability to create editions, its long-term performance in holding sharp detail is fundamentally different from carved stone, a difference rooted in its material structure.
Carved stone is a solid, monolithic block. Its failure point is typically a major structural crack. Cast stone, by contrast, is a composite of aggregates and cement. It is inherently more porous. This porosity is its Achilles’ heel in environments with freeze-thaw cycles. Water penetrates the microscopic pores of the cast stone surface. When that water freezes, its volume expands by approximately 9%, exerting immense pressure. This process, known as spalling, causes the surface to flake and crumble over time, gradually eroding the sharp details of the sculpture.
A long-term analysis of material costs reveals a classic “pay now or pay later” scenario. A study on the total cost of ownership over a 20-year period showed that while carved stone has a higher upfront investment, its maintenance is near-zero. Cast stone, though cheaper initially, requires diligent reapplication of a protective sealant every 3-5 years to prevent water ingress. When the cost of this maintenance labor and material is factored in over two decades, the total cost of the cast stone piece can actually exceed that of the carved stone one. Therefore, for a sculpture where the preservation of fine, sharp detail over decades is paramount, carved natural stone remains the superior choice for ensuring material integrity.
Key Takeaways
- Master the Mold: The complexity of your sculpture’s undercuts is the single largest driver of your initial mold budget. Simplifying them before production is your biggest cost-saving opportunity.
- Invest in Wax Work: Every hour you spend perfecting the wax replica in your studio saves multiple hours of expensive, difficult metal chasing labor at the foundry. This is the most effective form of “labor arbitrage.”
- Inspect for Porosity: Before any patina is applied, you must become the lead quality inspector. Identifying and addressing microscopic shrinkage porosity in the raw cast prevents catastrophic and costly rework.
How to Achieve a “Renaissance Brown” Patina on New Bronze Safely?
The classic, warm “Renaissance Brown” is one of the most versatile and desired patinas for bronze. It’s achieved with Ferric Nitrate, a chemical that, when applied with heat, creates beautiful, translucent amber and brown tones. However, like all patina chemicals, it requires a strict adherence to safety protocols. The process is closer to watercolor painting than house painting; the color is built up slowly in multiple, very light layers, not applied in one thick coat.
Safety is absolutely non-negotiable. The fumes from heated patina chemicals are hazardous, and a simple dust mask is completely inadequate. You must use a half-mask respirator fitted with acid gas cartridges. Chemical splash goggles and neoprene or nitrile gloves are also mandatory to protect your eyes and skin. The process involves heating the bronze surface with a torch and then spraying or brushing on a light mist of the Ferric Nitrate solution. The chemical reacts instantly with the hot metal, and the goal is to “blush” the color on, building depth with each pass.
For ultimate safety and the most even coloration, especially on complex pieces, a fuming chamber method can be used. This involves suspending the bronze sculpture in an enclosed chamber over a heated dish of Ferric Nitrate. The fumes, not the liquid, create the patina over several hours. This method produces an exceptionally even base color but requires a specialized setup. In either method, burnishing between layers with 0000 grade steel wool is critical for creating the deep, rich luster that defines a professional finish. As a guide from a respected metalworking institution emphasizes, the key is building color slowly and safely.
Ultimately, transforming your vision into bronze is a partnership. By arming yourself with this technical knowledge, you shift from being a passive client to an active collaborator in the manufacturing process. This expertise is your most powerful tool for negotiation, allowing you to control costs proactively and ensure the final work meets your exacting standards. Apply this analytical framework to your next project and approach the foundry not just with a sculpture, but with a plan.