In summary:
- Stop treating your knife like a brush; it’s a tool for depositing and sculpting paint, not for blending on the canvas.
- Clean colors come from loading your knife correctly and applying paint with a single, confident stroke that places color next to or on top of another.
- Mastering pressure is key. Too little pressure creates hesitant marks, while too much can scrape your canvas.
- Use cost-effective materials like modeling paste to build texture, saving expensive oil paints for the final color layers.
There’s a familiar moment of frustration for every painter transitioning from brushes to palette knives. You load your knife with a beautiful, pure color, apply it to the canvas, and in an instant, it’s contaminated—a single, disappointing shade of mud where you envisioned a crisp, vibrant mark. It feels uncontrollable, as if the very act of touching the canvas dooms your colors to blend into an indistinct mess. You might think the solution is to obsessively wipe your knife or perfectly pre-mix every single hue on your palette.
But what if the problem isn’t about cleanliness, but about physics? The real secret to clean, intentional knife work is a mental shift. You must stop thinking of your knife as a flat brush and start treating it as a sculptural tool. Its purpose is to deposit, carve, and layer a physical mass of paint. Unlike a brush, which is designed to blend and feather, a knife is designed to place one color next to or on top of another with minimal disturbance. This is not about avoiding mixing; it’s about controlling where and how that mixing happens.
This change in perspective is the foundation for everything that follows. It transforms your relationship with the tool from one of timidly dabbing color to confidently sculpting with it. When you understand that you are working with volume and viscosity, not just hue, you unlock the ability to create marks that are both loose and precise, full of energy yet perfectly controlled. It’s the difference between a mess and a masterpiece.
This guide will walk you through the essential principles of knife painting, from the way you hold the tool to the way you think about paint itself. We will break down the techniques that allow you to build texture, layer color, and create marks with confidence, turning that initial frustration into a feeling of creative freedom.
Summary: A Practical Guide to Vibrant Palette Knife Painting
- Why your knife strokes look messy instead of sharp and intentional?
- How to load multi-colored paint on a knife for a single complex stroke?
- Flexible steel vs. Rigid plastic: Which tool creates better organic textures?
- The pressure error that scrapes the primer off the canvas
- How to use heavy impasto without wasting $50 of paint per session?
- How to paint from the shoulder to create marks that feel monumental?
- How to manipulate paint viscosity to create rhythm in a single stroke?
- How to Loosen Up Your Brushwork Without Losing the Drawing’s Accuracy?
Why Your Knife Strokes Look Messy Instead of Sharp and Intentional?
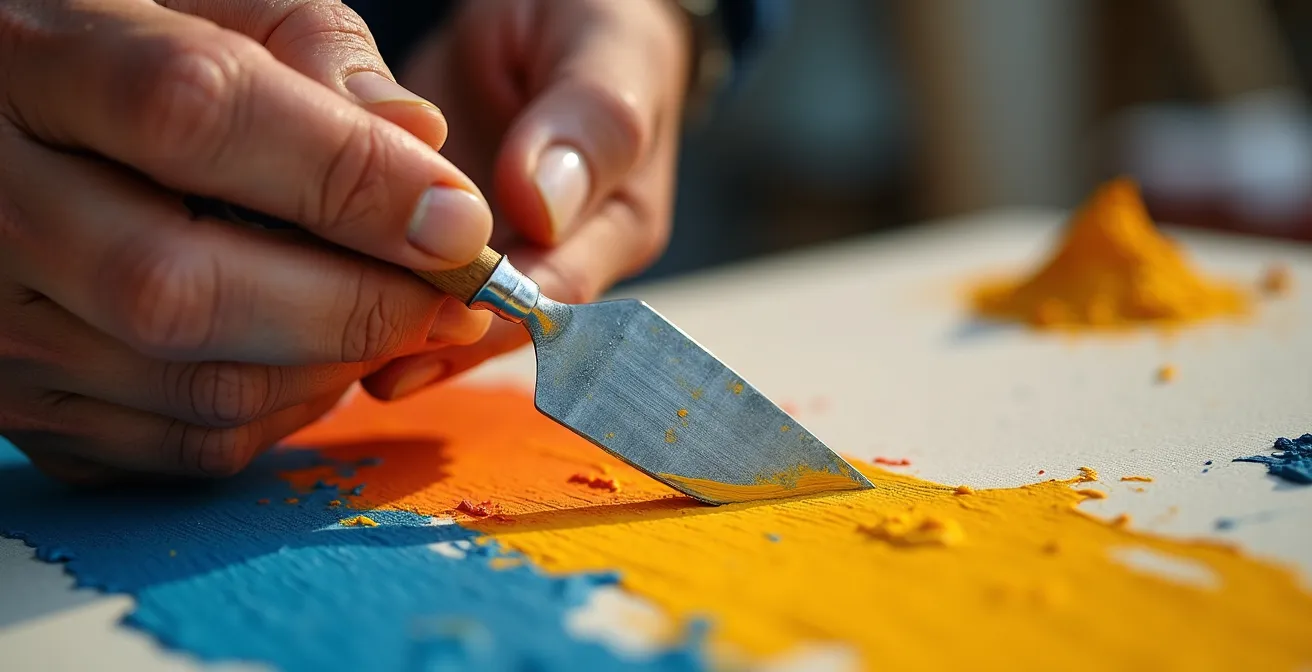
If your knife strokes feel hesitant and muddy, it’s likely because you’re painting with a brush mentality. A brush blends; a knife deposits. Messy strokes are often the result of “petting” the canvas—multiple, timid touches that over-mix the paint. A sharp, intentional stroke is born from confidence and a clear understanding of the knife’s purpose: to lay down a single, decisive slab of color. Think of it less like painting and more like frosting a cake. You load your tool and apply the frosting in one smooth, committed motion.
This shift requires seeing paint not just as color, but as a physical, sculptural mass. Each stroke should have a beginning, a middle, and an end, all executed in a single gesture. The angle, pressure, and speed of that gesture determine the character of the mark. A messy stroke is often a sign of uncertainty, where the hand wavers and reworks the paint. An intentional stroke is a direct translation of an idea into a physical form on the canvas, a concept masterfully demonstrated by artists throughout history.
Case Study: Van Gogh’s Deliberate Knife Technique in Starry Night
Van Gogh’s Starry Night demonstrates masterful knife control where the impasto technique creates movement in the sky through deliberate strokes rather than random application. His methodical approach shows how knife angle and pressure variations create intentional texture that guides the viewer’s eye through the composition, proving that energy and control can coexist.
To achieve this level of control, you need a repeatable process. It’s not about being rigid but about building a foundation of good habits that allows your creativity to flow without being hindered by technical sloppiness. The following steps will help you move from messy dabs to confident, clean marks.
Your Action Plan for Intentional Marks
- Prepare a Clean Slate: Mix your colors on your palette completely before loading the knife. This prevents uncontrolled mixing and muddy results directly on the canvas.
- Maintain Your Angle: Hold the knife at a consistent 45-degree angle to the canvas. This helps maintain uniform pressure and avoids the sharp edge accidentally scraping the surface.
- Practice Color Purity: Wipe the knife clean with a paper towel between each and every color application. This non-negotiable step is the simplest way to keep your colors vibrant.
- Commit to the Stroke: Apply paint with a single, confident motion rather than multiple hesitant strokes. A decisive action deposits the paint cleanly without churning what’s underneath.
- Calibrate Your Pressure: Test your knife pressure on a practice surface or the edge of the canvas to understand how the angle and force affect the thickness of the paint deposit.
How to Load Multi-Colored Paint on a Knife for a Single Complex Stroke?
Creating a complex, multi-colored stroke with a single swipe of the knife is one of the most satisfying techniques in impasto painting. It’s the secret to rendering the subtle color shifts in a sunset sky or the marbled texture of a rock in one efficient, energetic mark. The key is to load the knife so that the colors sit side-by-side or layered on the blade, rather than mixed. When you press the knife to the canvas, these colors transfer in a beautiful, organic pattern that feels both spontaneous and controlled.
Imagine the edge of your knife as a small palette. You can dip one side into a light color and the other side into a dark color to create a two-tone effect for highlights and shadows. Or, you can “sandwich” colors by picking up a base layer and then lightly tapping the tip into one or two other colors. This “controlled chaos” approach allows the paint to mix partially and unpredictably on the canvas, creating textures that would be impossible to render with a brush. The beauty of this method lies in its ability to produce complex results from a simple action.
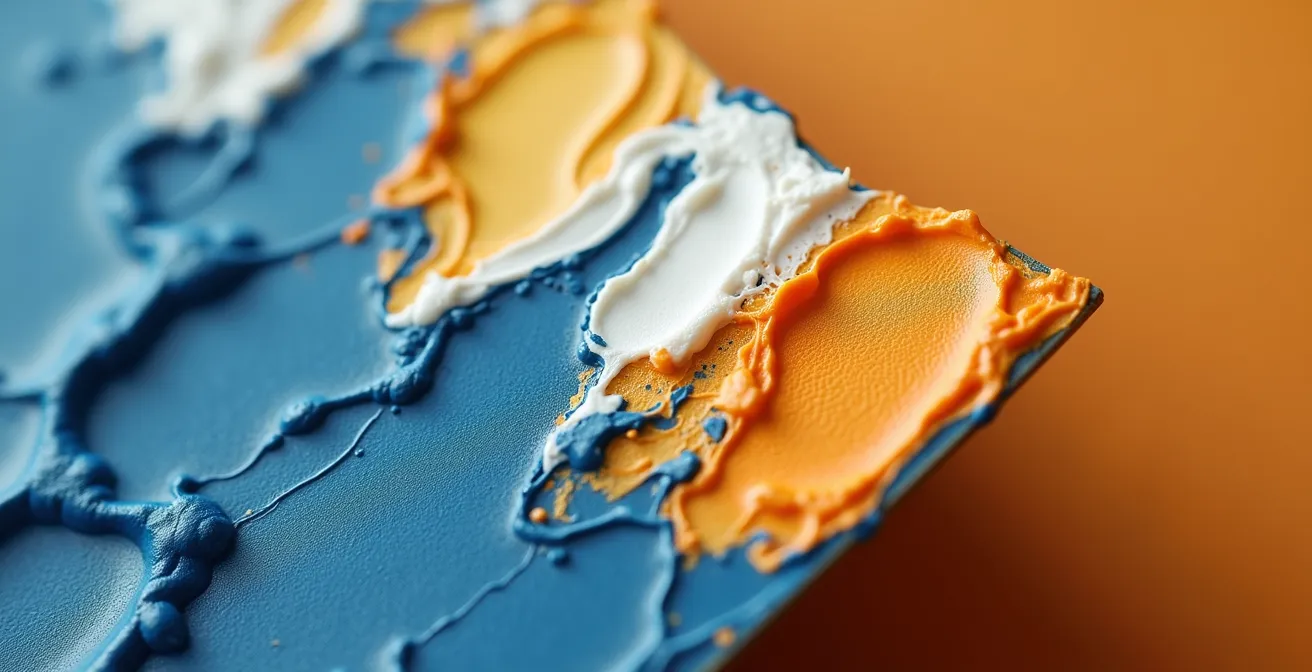
As the image above illustrates, loading the blade with distinct bands of color creates a natural gradient when applied. The way you load your knife directly determines the character of your stroke. Experimenting with different methods is crucial for developing a versatile visual language. Certain loading styles are better suited for specific effects, from sharp architectural lines to soft, blended surfaces.
The following table, based on information from an analysis of different palette knife methods, breaks down some of the most effective techniques for loading your knife. Understanding these options will expand your creative possibilities enormously.
| Loading Method | Effect Created | Best For | Difficulty |
|---|---|---|---|
| Edge Loading | Sharp color transitions | Architectural details, horizons | Easy |
| Flat Loading | Smooth gradients | Sky, water surfaces | Medium |
| Layered Sandwich | Marbled textures | Organic forms, rocks | Advanced |
| Double Loading | Two-tone effects | Flowers, highlights/shadows | Medium |
Flexible Steel vs. Rigid Plastic: Which Tool Creates Better Organic Tectures?
The debate between steel and plastic palette knives isn’t just about durability; it’s about the very character of the marks they create. While plastic knives are an affordable entry point, they are typically rigid and less responsive. This rigidity lends itself to sharp, geometric, and architectural marks. However, for creating soft, flowing, and truly organic textures, a flexible steel knife is almost always superior. The subtle spring and bend of a metal blade allow for a greater range of expression, responding to the slightest change in pressure from your hand.
A flexible steel knife can bend into a curve, creating a sweeping, calligraphic stroke that a rigid plastic knife simply cannot replicate. It allows you to “sculpt” the paint, creating soft edges and varied thicknesses within a single mark. This responsiveness is why, according to material comparison studies, an overwhelming 87% of professional impasto artists prefer metal knives for their flexibility and durability. Think of the plastic knife as a ruler for straight lines and the steel knife as a pen for expressive script. Both have their place, but for organic forms, flexibility is king.
Case Study: Frank Auerbach’s Texture Creation
Frank Auerbach’s thickly painted works are a testament to the power of a flexible tool. His technique demonstrates how flexible steel knives create more dynamic, living textures than rigid ones. The steel blade bends to create curved, energetic strokes that feel organic, a feat nearly impossible with stiff plastic. Conversely, the sharp, flat planes in his urban landscapes show how rigid tools can excel at creating architectural structure.
Your choice of knife is a choice about your painting’s personality. If you’re painting a craggy rock face, a flower petal, or rolling waves, the subtle give of a steel knife will help you capture that natural movement. For a beginner, starting with a small, flexible trowel-shaped steel knife (like a #2 or #5) is often the best investment. It offers a balance of control and expressiveness that will help you grow your skills far more than a set of rigid plastic knives ever could.
The Pressure Error That Scrapes the Primer Off the Canvas
There’s a horrifying sound every new knife painter dreads: the sharp “zing” of the knife’s edge scraping against the canvas, tearing a gash in the gesso. This common and frustrating error happens when you apply too much pressure with the knife held at too steep an angle. Instead of depositing paint, you’re effectively cutting into the surface. It’s an issue that can make you timid and hesitant, leading to the weak, muddy strokes we want to avoid. The solution lies in a combination of surface preparation and technique refinement.
First, recognize that not all canvases are created equal. Budget canvases often have a very thin layer of primer (gesso) that offers little protection. A simple fix is to apply two or three additional coats of quality gesso before you start painting, sanding lightly between coats. This builds a thicker, more durable foundation. Second, the paint itself acts as a lubricant and a protective barrier. Always load your knife with more paint than you think you need. A generous dollop of paint ensures the knife glides over the surface rather than digging into it. Maintain a consistent 30-45 degree angle to keep the sharp edge from making direct contact.
The experience of damaging a canvas is a common rite of passage, but one that teaches a valuable lesson about the interplay between tools, materials, and technique.
I ruined three canvases before realizing the issue wasn’t my technique but the thin primer on budget canvases. Now I always apply extra gesso layers and use the paint itself as a protective barrier between knife and canvas. Haven’t damaged a surface since.
– Artist Testimonial
Finally, train your ear. That scraping sound is a warning. The moment you hear it, stop, lift your knife, and adjust your angle or pressure. Support the back of the canvas with your non-dominant hand, especially on larger pieces, to prevent it from flexing away from your knife, which can cause you to press harder. By preparing your surface and learning to control your pressure, you can paint with confidence, knowing your canvas is safe.
How to Use Heavy Impasto Without Wasting $50 of Paint Per Session?
The glorious, thick texture of heavy impasto is a joy to create, but it can be prohibitively expensive. The thought of squeezing out half a tube of expensive cadmium red just to build up one small area is enough to make any artist hesitant. This hesitation leads to thin, weak applications that lack the confident dimensionality of true impasto. The secret to achieving that rich texture without going broke is to stop thinking that the texture has to be made of pure, expensive paint. Instead, you build the form first with cheaper materials and use your costly oils only for the final, visible layer of color.
The most effective strategy is texture underpainting. You can use materials like acrylic modeling paste or even thick layers of gesso to build up the physical structure of your painting. These materials are a fraction of the cost of oil paint and dry much faster. You can sculpt them with your knife, let them dry completely, and then apply a thin, color-rich layer of oil paint on top. This technique gives you the exact same visual and textural effect of heavy impasto while using significantly less oil paint. In fact, studies on impasto material efficiency show that artists report a 60-70% reduction in expensive paint usage when using this method.
Another approach is to use mediums to extend your paint. Cold wax medium can be mixed into your oil paint to add body and volume, while alkyd mediums can help build layers that dry faster. While these are not as cheap as modeling paste, they are still far more cost-effective than using pure paint for bulk. Understanding your material options allows you to make strategic choices based on your budget and desired effect.
This table, using data from a guide on impasto materials, illustrates the economic advantages of building texture with alternative materials.
| Material | Cost per 100ml (Approx.) | Coverage | Best Use |
|---|---|---|---|
| Pure Oil Paint | $15-50 | Low | Final color layer only |
| Modeling Paste | $3-5 | High | Texture underpainting |
| Cold Wax Medium | $8-12 | Medium | Extending paint volume |
| Alkyd Medium | $6-10 | Medium | Faster drying layers |
How to Paint from the Shoulder to Create Marks That Feel Monumental?
Small, tight marks come from the wrist. Monumental, sweeping, and energetic marks come from the shoulder and the core. If your knife work feels cramped and fussy, it’s because you are drawing with your hand instead of painting with your whole body. To create marks that have a sense of scale and power, you must lock your wrist and elbow and initiate the movement from your shoulder. This engages your entire arm, allowing you to make larger, more fluid, and more confident strokes.
The practice of painting from the shoulder is a cornerstone of gestural art. It requires you to stand, not sit, with your feet shoulder-width apart to create a stable base. Hold the knife lightly, like a conductor’s baton, not tightly like a pencil. The movement should originate from the rotation of your torso and the swing of your arm, with your hand and knife simply being the final point of contact. This whole-body engagement is what gives abstract expressionist works their incredible sense of dynamism and scale.
Case Study: The Abstract Expressionist Whole-Body Painting Technique
The work of artists like Hans Hofmann and Willem de Kooning is a masterclass in shoulder-driven painting. Their large canvases required them to use their entire body’s movement to create sweeping, gestural marks. By shifting their weight from their legs through their core to their shoulder, they could create monumental strokes that would be physically impossible to achieve using just wrist or elbow movement.
To get a feel for this, practice making large “ghost strokes” in the air before you touch the canvas. Feel the movement originating in your back and shoulder. You can even use a mahl stick or an extended-handle knife to force your body to engage more fully. Shifting your weight from one foot to the other as you make the stroke will add even more power and fluidity. This isn’t just a physical technique; it’s a way of connecting more deeply and authentically with the act of painting.
How to Manipulate Paint Viscosity to Create Rhythm in a Single Stroke?
Rhythm in a painting isn’t just about composition; it’s also about texture. A single knife stroke can contain its own narrative of speed and energy by manipulating the viscosity of the paint. Imagine a stroke that starts as a thick, heavy impasto mark and then, as your pressure lessens and the paint thins out, tapers off into a smooth, thin glaze. This transition from thick to thin, from opaque to translucent, creates a powerful sense of movement and rhythm. It guides the viewer’s eye and adds a dynamic quality that a stroke of uniform thickness cannot achieve.
This effect is achieved by controlling two variables: the amount of medium mixed into your paint and the pressure you apply. You can load one part of your knife with thick, buttery paint straight from the tube and another part with paint that has been thinned slightly with a solvent or oil medium. As you draw the knife across the canvas, the viscosity changes, creating a natural flow. The thick paint catches the light and creates a strong physical presence, while the thinned paint settles into the canvas, creating a sense of distance or speed. This is using viscosity as a creative tool, not just a technical property.
You can also be mindful of your environment. Temperature plays a surprisingly significant role in paint consistency. According to material science research, paint viscosity can change by approximately 15-20% for every 10°F (about 5.5°C) temperature variation. On a cold day, your paint will be stiffer and more suited for sharp, structural marks. In a warmer studio, it will be softer and more pliable, ideal for smoother, more blended applications. Being aware of this allows you to work with your materials, not against them, to create the exact textural rhythm you envision.
Key Takeaways
- Clean color is a result of technique, not just hygiene. Focus on depositing paint with single, confident strokes.
- Your knife is a versatile tool. Master different loading techniques (edge, flat, layered) to create a variety of textures and effects.
- Choose your tools wisely. Flexible steel knives offer superior control for organic textures, while rigid plastic knives excel at geometric marks.
How to Loosen Up Your Brushwork Without Losing the Drawing’s Accuracy?
One of the biggest fears when embracing a looser, more expressive style is that you will lose the underlying structure and accuracy of your drawing. It feels like a choice between energetic marks and recognizable forms. But the two are not mutually exclusive. The key to painting loosely without losing accuracy is to simplify your initial drawing into a “structural ghost.” This means you are not creating a detailed sketch to be colored in, but rather a simple map of major shapes, planes, and value masses.
This map should be done with a thinned, neutral color, focusing only on the big, essential forms. Ignore the small details. This “ghost” provides just enough of a guide to ensure your proportions are correct and your composition is sound. With this foundational structure in place, you are then free to apply your paint with loose, energetic, and expressive knife strokes. Your mind knows where the major elements are, so your hand is free to be creative in how it renders them. You’re no longer afraid of “messing up the drawing” because the drawing is just a whisper, not a scream.
Case Study: The “Structural Ghost” Drawing Technique
Contemporary artist Jerry Poon successfully demonstrates the ‘structural ghost’ technique. His process involves using a neutral color to map out only the major shapes of his subject. This provides just enough guidance for maintaining accurate proportions while allowing for incredibly loose, expressive knife work on top. As a result, his landscapes maintain clearly recognizable forms despite being built from energetic, seemingly random strokes.
This approach forces you to see in terms of shapes and values rather than lines and details, which is the essence of painterly work. It encourages you to suggest detail rather than meticulously render it, trusting the viewer’s eye to fill in the gaps. By building your painting on a foundation of simple, strong shapes, you gain the confidence to let your knife work be as wild and free as you want it to be, secure in the knowledge that your painting’s structural integrity is already locked in.
Frequently Asked Questions About Clean Palette Knife Painting
Won’t I lose important details if I paint loosely?
Details should be suggested rather than rendered. The viewer’s eye fills in what’s implied by the accurate placement of major shapes and values. Focus on getting the big shapes right, and the details will take care of themselves.
How do I know when to stop refining?
Stop when adding another stroke would tighten rather than enhance the painting. The goal is freshness and energy. Step back from your canvas frequently—every few minutes—to assess the overall impact from a distance. If it feels right from five feet away, it’s probably done.
Should I use reference photos or paint from life for loose work?
Painting from life naturally encourages looser work because the light and scene are constantly changing, forcing you to capture an impression rather than copy details. Photos can work, but you must consciously simplify them. Try squinting at your photo to blur the details and see only the major value shapes.