Transitioning to digital isn’t about finding the right “film grain” filter; it’s about fundamentally rethinking your process to translate your artistic soul.
- RAW files are not sterile images, but latent data full of potential, much like an undeveloped negative.
- The key is to build a “digital darkroom” workflow that restores the tactile control and intentionality you had with film.
Recommendation: Stop chasing presets and start mastering the principles—from color science to storage philosophy—to make the digital medium truly your own.
If you’re a photographer who came up through the amber glow of a safelight, you know the feeling. The scent of fixer, the weight of a negative carrier, the slow magic of an image blooming to life in the developer tray—it’s a physical, alchemical process. The move to digital, by contrast, can feel like a profound loss. The “sterile” perfection of a RAW file on a screen, manipulated with the cold click of a mouse, often seems to lack the very soul you’ve spent years cultivating in your work. You’re told to just “add a grain preset” or “buy a better monitor,” but this advice misses the point entirely.
The frustration isn’t about nostalgia; it’s about a loss of authorship and control over the final print. The so-called flaws of film—its grain, its subtle color shifts, its limited latitude—were not flaws at all. They were constraints that shaped your vision and became part of your artistic signature. The common wisdom suggests you must simply accept the clinical nature of digital, but this approach forces you to abandon your hard-won aesthetic.
But what if the goal wasn’t to poorly mimic film, but to *translate* your personal vision using a new, powerful set of tools? What if you could build a digital darkroom that felt just as intentional, tactile, and personal as your physical one? This is not about finding the perfect filter. It’s about understanding the new medium on its own terms to bend it to your will. It’s about seeing the data in a RAW file not as a finished picture, but as a latent image waiting for your unique interpretation.
This guide will walk you through the essential philosophies and technical masteries required to make that leap. We will deconstruct the differences between film grain and digital noise, establish a controlled digital environment, and explore workflows and storage strategies that treat your digital files with the same reverence as a box of cherished negatives. The objective is to help you regain your voice and prove that soul is not a property of the medium, but of the artist.
To navigate this transition effectively, it’s crucial to understand each component of the new digital darkroom. The following sections break down the core concepts you’ll need to master to translate your film-based artistry into a powerful and personal digital practice.
Summary: A Photographer’s Guide to Digital Soul
- Why digital noise looks ugly but film grain looks artistic (and how to fake it)?
- How to color-calibrate your monitor to match your printer output perfectly?
- Lightroom vs. Photoshop: Which is better for a high-volume wedding workflow?
- The hard drive storage mistake that will erase your archive in 5 years
- When to upgrade your sensor: realizing megapixel count matters less than dynamic range?
- Why fewer pixels on a larger sensor create cleaner images in low light?
- How to light a painting for IR to avoid glare obscuring the underdrawing?
- How to Sell Digital Art When Collectors Can’t Hang It on a Wall?
Why digital noise looks ugly but film grain looks artistic (and how to fake it)?
One of the most immediate and jarring differences for a film photographer is the character of image texture. Film grain feels organic, adding a tangible quality to a print. Digital noise, on the other hand, often just looks like a messy, electronic defect. The reason for this aesthetic gulf lies in their fundamental structure. As photography experts explain, film grain is composed of randomly scattered silver halide crystals of varying sizes, creating a chaotic, natural texture. In contrast, digital noise is a fixed, grid-based pattern of sensor photosites reporting incorrect color or luminance information. Our brains perceive the randomness of grain as pleasingly organic, while the uniformity of noise registers as an artificial and distracting flaw.
The mistake many photographers make is applying a simple, uniform “grain” filter over their entire image. This often just replaces one artificial pattern with another. To achieve intentional imperfection that mimics the soul of film, you must think in layers, just as you would when dodging and burning. The goal is not just to add texture, but to create a texture that interacts believably with the light and shadow in your image. True film grain is not monolithic; it’s more apparent in the midtones and less so in the deep shadows or blown-out highlights.
Recreating this effect requires a more sophisticated approach than a single slider. By building grain on separate layers targeted to different tonal ranges and ensuring it affects only luminance (brightness) and not chrominance (color), you can move from a cheap-looking effect to a rich, believable texture that genuinely enhances the image. This is the first step in mastering the digital darkroom: learning to build, not just apply, your aesthetic.
Your Action Plan: Creating Authentic Digital Grain
- Isolate Tonal Ranges: Create separate grain layers specifically for your shadows, midtones, and highlights, using different opacity levels for each to mimic how film responds to light.
- Prioritize Luminance: Ensure your grain effect is set to apply to luminance only, avoiding the colorful speckles of “chroma noise” that instantly signal a digital artifact.
- Consider the Final Medium: When creating prints, simulate both film grain and paper texture by adding a subtle, uniform grain layer on top to represent the physical surface of the paper itself.
- Vary Grain Structure: Use tools that allow you to change the size and roughness of the grain to match the “film stock” you’re emulating, from the fine grain of a slow film to the coarse texture of a high-speed one.
- Analyze Real Film: Study high-resolution scans of your favorite film stocks to observe how grain behaves in different lighting conditions, then aim to replicate that specific character, not a generic idea of “grain.”
How to color-calibrate your monitor to match your printer output perfectly?
In a physical darkroom, you have tangible controls: chemical temperature, enlarger height, and trusted test strips. In the digital darkroom, your monitor is your only window into the image. If that window is tinted, everything you do will be based on false information. Color calibration isn’t an optional step for fussy professionals; it is the absolute foundation of a predictable workflow. Without it, the stunning image you see on screen can become a muddy, color-shifted disappointment when printed. The goal is to create a closed-loop system where what you see is what you get (WYSIWYG), ensuring your artistic intent survives the transition from pixels to paper.
This process involves using a hardware device called a colorimeter or spectrophotometer to measure your monitor’s output. It generates a custom “profile” (an ICC profile) that tells your operating system and editing software exactly how to correct the display’s inaccuracies. But calibration goes beyond just the screen. Your viewing environment is just as critical. Editing in a room with warm yellow light or a bright blue wall will contaminate your perception of color, tricking you into making incorrect adjustments. Professionals build a controlled environment with neutral gray walls and standardized 5000K (D50) lighting to ensure their eyes are as neutral as their screen.
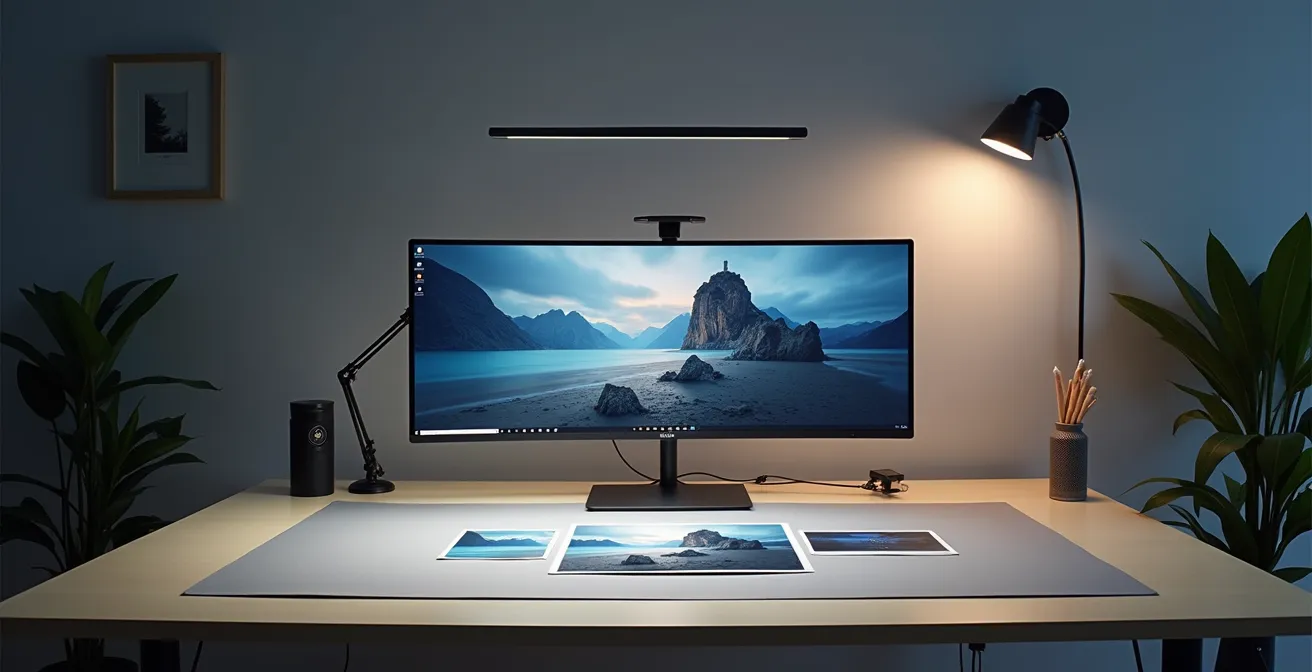
As the workspace above illustrates, a truly calibrated setup is an ecosystem. It includes the calibrated monitor, controlled ambient lighting, and physical proof prints for comparison. Choosing the right hardware is the first step in building this reliable environment. The market offers a range of devices tailored to different needs and budgets, from entry-level tools for enthusiasts to professional systems with built-in calibration.
This table compares some popular options to help you choose the right starting point for your digital darkroom. As an analysis of calibration hardware shows, the investment is directly tied to the level of precision required.
| Device | Price | Key Feature | Best For |
|---|---|---|---|
| Datacolor Spyder X2 Ultra | $350 | HDR support, 2-min calibration | HDR content creators |
| Calibrite Display Pro | $285 | Entry-level accuracy | Budget-conscious photographers |
| EIZO CS 2731 | ~$1300 | Built-in calibration | Professional studios |
Lightroom vs. Photoshop: Which is better for a high-volume wedding workflow?
The “Lightroom versus Photoshop” debate often misses the point for a film-minded photographer. The question isn’t which is “better,” but what role each plays in your workflow philosophy. Thinking in darkroom terms provides a powerful analogy: Lightroom is your development tank and contact sheet station, while Photoshop is your master enlarger for creating a single, perfect print. One is for processing rolls of film in bulk; the other is for meticulous, fine-art work on a single negative.
For a high-volume job like a wedding, where you return with thousands of images, starting in Photoshop would be like making a gallery-quality 16×20 print of every single frame on a roll of film—it’s inefficient and insane. Lightroom is designed for this culling and batch-processing stage. Its Library module acts as your digital light table for sorting, rating, and organizing your “shoots.” The Develop module is your development tank, allowing you to apply global adjustments (exposure, contrast, color) consistently across hundreds of images at once, just like developing a roll of film with the same chemistry.
Photoshop, conversely, excels where Lightroom falls short: intricate, pixel-level manipulation. This is your digital enlarger, where you take a single “hero shot” that you’ve already processed in Lightroom and perform detailed dodging and burning, blemish removal, or complex compositing. It’s a tool for singular focus, not mass production. The key to an efficient and soulful workflow is not to choose one over the other, but to create a hybrid system where each tool is used for its intended purpose.
This hybrid workflow, as comparative analyses of photography software suggest, allows for both speed and precision, mirroring the traditional process of proofing and then perfecting.
| Aspect | Lightroom (Digital Developer Tank) | Photoshop (Digital Enlarger) |
|---|---|---|
| Best For | Global adjustments, batch processing, sorting ‘rolls of film’ | Single ‘master’ prints, meticulous dodging/burning |
| Workflow Speed | Fast for high volume | Slower, detail-oriented |
| Learning Curve | Moderate | Steep |
| Tactile Control | MIDI controllers (Loupedeck, Palette Gear) | Graphics tablets, MIDI controllers |
To bring back the physicality of the darkroom, consider integrating hardware controllers like a Loupedeck or a graphics tablet. This introduces tactile translation, allowing you to adjust sliders and paint masks with physical knobs and pens, restoring a sense of craft that a mouse can never offer.
The hard drive storage mistake that will erase your archive in 5 years
In the film era, your archive was a physical thing: binders of negatives, carefully stored in a cool, dry place. You could see and touch your life’s work. In the digital age, your archive is an invisible collection of ones and zeroes on a hard drive—a device that is not a question of *if* it will fail, but *when*. The single biggest mistake a photographer can make is trusting their entire archive to a single external hard drive. This is the digital equivalent of storing all your negatives in a flimsy cardboard box in a damp basement.
All hard drives fail. Whether through mechanical breakdown, electronic failure, or accidental damage, a single point of failure guarantees eventual data loss. To treat your digital archive with the reverence it deserves, you must adopt a robust, redundant backup strategy. The industry gold standard is the 3-2-1 backup rule. It’s a simple but powerful framework for ensuring your work survives device failure, theft, or even a natural disaster.
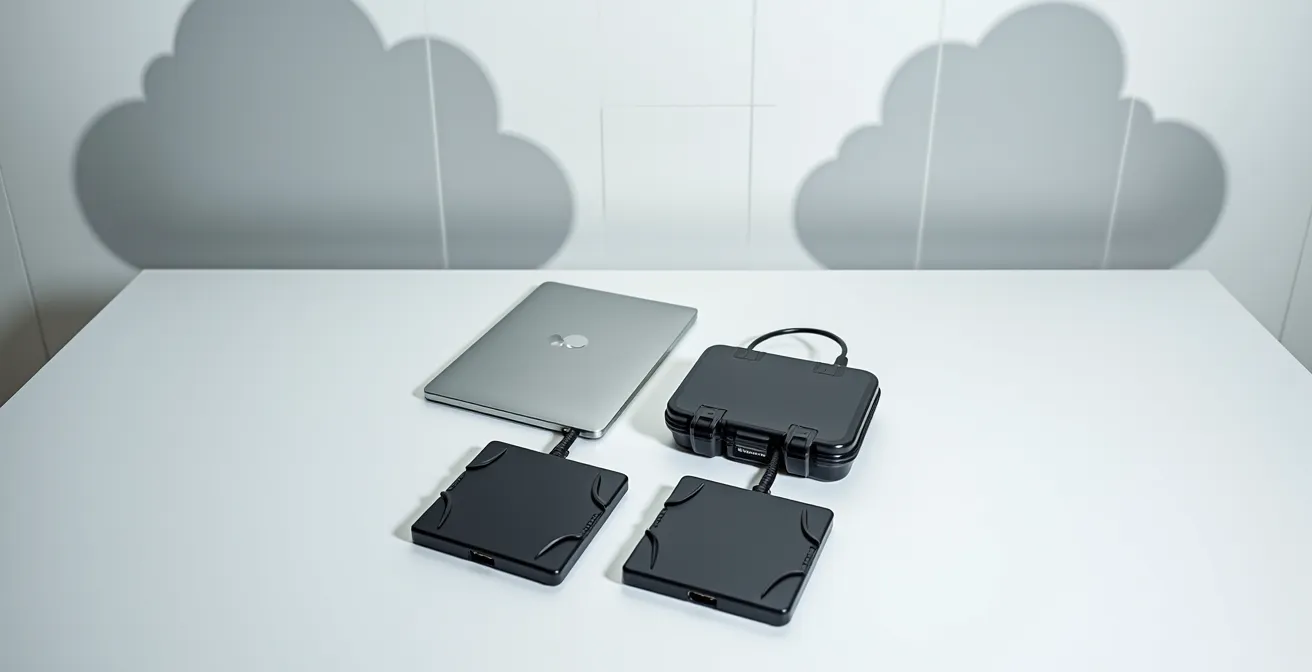
This concept, visualized above, creates multiple layers of protection. The widely recognized 3-2-1 backup strategy provides a clear framework:
- 3 copies of your data: Your original working files, plus two full backups.
- 2 different media types: Don’t rely solely on one brand or type of hard drive. Use a mix, such as an internal SSD, an external HDD, and cloud storage. This protects you from a specific model’s manufacturing defect.
- 1 offsite location: At least one of your backups must be stored in a different physical location. This could be a drive kept at a friend’s house, a bank safe deposit box, or, most commonly, a cloud backup service. This protects your work from fire, flood, or theft at your primary location.
Case Study: The 3-2-1 Rule in Action
The value of an offsite backup is not theoretical. One professional photographer using the cloud service Backblaze shared their experience: “One morning, a couple of years back, my 16TB external HD failed with 7TB of data. The failure happened at 8 on a Thursday morning and I had an 8TB [replacement] in my hands from [the backup service] by Monday morning and all data was transferred to a new 16TB HD by Tues morning.” Without that offsite, cloud-based copy, 7TB of work would have been lost forever.
When to upgrade your sensor: realizing megapixel count matters less than dynamic range?
The digital camera market constantly pushes one metric above all others: megapixels. It’s an easy number to market, and it creates a perpetual cycle of “gear acquisition syndrome.” But for a photographer seeking the nuance of a film-like image, chasing a higher megapixel count is often a fool’s errand. The far more critical metric for translating a film aesthetic is dynamic range (DR). Dynamic range is a sensor’s ability to capture detail in both the brightest highlights and the darkest shadows of a single exposure.
This concept should be immediately familiar to any film photographer. It is the direct digital equivalent of a film stock’s exposure latitude. Some films, like Velvia, had very narrow latitude, crushing shadows into black and blowing highlights to white easily, demanding precise exposure. Others, like Kodak Portra, were famously forgiving, with wide latitude that held onto an incredible amount of information in the extremes of the tonal range. A camera sensor with high dynamic range behaves like a film with wide latitude, giving you more information to work with in your digital darkroom.
This is where the soul of the image is often found. The ability to pull detail out of a deep shadow or recover a seemingly blown-out highlight is what gives you the flexibility to shape the light in post-production, much like you would through dodging and burning in the enlarger. An image from a low-DR sensor is “baked in,” with lost information that can never be recovered. As one expert puts it, this relationship is fundamental to bridging the gap between the two mediums.
A high DR sensor is the equivalent of a film with wide exposure latitude (like Kodak Portra), holding detail in both the brightest highlights and deepest shadows, giving you more information to work with in the ‘digital darkroom.’
– Photography Expert, Discussion on sensor technology and film latitude comparison
So, when should you upgrade your sensor? Not when a new model offers more megapixels, but when a new generation of sensor technology provides a significant, measurable increase in dynamic range. That extra stop or two of highlight and shadow detail will do far more for your artistic expression than a larger file size ever will.
Why fewer pixels on a larger sensor create cleaner images in low light?
Another common marketing trap is the idea that more pixels are always better. While this can be true for massive prints viewed up close, it comes with a significant trade-off, especially for photographers who work in challenging light. The secret to clean low-light performance isn’t the number of pixels, but their size. A full-frame sensor has a fixed surface area. If you cram 60 million pixels onto it, each individual pixel (or “photosite”) must be tiny. If you only have 12 million pixels, each one can be much larger.
Larger photosites are like bigger buckets for catching light. In a dim environment, a bigger bucket will collect more photons, leading to a stronger, cleaner signal with less “noise” or interference. A tiny bucket will struggle to collect enough light, resulting in a weak signal that has to be amplified, which also amplifies the inherent electronic noise. This is why a 12-megapixel Sony A7S III can produce stunningly clean images at high ISOs, while a 60-megapixel A7R V might show more noise in the same conditions. It’s a matter of physics.
Once again, a film analogy makes this concept intuitive. Think of a sensor’s pixel configuration as its native “film speed.” A high-megapixel sensor with small photosites behaves like a slow, fine-grain film (like ISO 50 or 100). It’s fantastic in bright studio light, capturing immense detail, but it struggles in the dark. A low-megapixel sensor with large photosites acts like a fast, grainy film (like Delta 3200). It excels in low light, capturing usable images where other cameras fail, but with a potential trade-off in ultimate resolution.
This direct comparison, as shown in this helpful analogy table, helps you choose a camera based on your primary shooting style, not just marketing numbers.
| Camera Type | Digital Equivalent | Film Analogy | Best Use Case |
|---|---|---|---|
| 12MP Full Frame | Large photosites | Fast film (Delta 3200) | Low-light events, concerts |
| 60MP Full Frame | Small photosites | Slow, fine-grain film | Studio, landscape detail |
Choosing a camera, then, becomes a conscious artistic choice. Do you need the fine-grain detail of a “slow film” sensor for landscape work, or the low-light capabilities of a “fast film” sensor for photojournalism? Understanding this trade-off empowers you to select a tool that serves your vision.
How to light a painting for IR to avoid glare obscuring the underdrawing?
While this title refers to a highly specific scientific imaging technique, it offers a profound metaphor for our entire digital transition: seeing the unseen. In art conservation, infrared photography is used to peer through layers of oil paint to reveal the artist’s original sketch, or “underdrawing,” hidden beneath. It shows the artist’s initial intent, the changes they made, and the foundational structure of the final masterpiece. This is precisely what a RAW file is.
A standard JPEG file is like the finished painting. It’s been processed, compressed, and flattened. Its colors are baked in, its dynamic range is clipped, and much of the original data captured by the sensor has been discarded to create a small, convenient file. You can make minor adjustments to a JPEG, but you can’t fundamentally change its character. You are merely looking at the surface.
The RAW file, however, is the digital underdrawing. It is the raw, unprocessed sensor data—a vast trove of information about the light, color, and tones of the scene. It may look flat and unappealing on first glance, just as an underdrawing is not a finished work. But within that data lies an incredible potential for interpretation. This is the “hidden layer” that separates a snapshot from a crafted photograph. The act of processing a RAW file in your digital darkroom is the act of revealing this potential and making the thousands of micro-decisions that transform raw data into a work of art.
Just as infrared photography reveals the hidden underdrawing of a painting, shooting in RAW reveals a hidden layer of data and potential beneath the surface of the standard JPEG. The RAW file is the ‘underdrawing’ of your final photograph.
– Digital Photography Theorist, Conceptual comparison of IR photography and RAW processing
Embracing this mindset is the single most important step in your transition. Stop seeing the RAW file as a sterile starting point and start seeing it as your latent image. It contains all the information you need to dodge, burn, adjust contrast, and shift color to realize your vision. The art is no longer just in the capture; it’s equally in the development. This is how you reclaim your authorship in the digital age.
Key takeaways
- Treat your RAW file like a latent negative, not a finished image. The art is in the development.
- Build a “digital darkroom”—a calibrated, controlled ecosystem—to regain the intentionality of film processing.
- Reclaim tactile control through tools and workflows that connect you physically to your editing process.
How to Sell Digital Art When Collectors Can’t Hang It on a Wall?
The final stage of the photographic process has always been the print. The print is the ultimate expression of the artist’s vision, the tangible artifact that can be held, framed, and displayed. A common anxiety in the digital era is that the work exists only as an ephemeral file, making it difficult to sell to collectors who value physical ownership. The solution is simple and profound: the print is still the answer. The mastery of your digital darkroom finds its ultimate proof in a stunning, archival-quality physical print.
Selling “digital art” doesn’t mean you have to sell a file on a USB stick or as an NFT. For most photographers, the most effective strategy is a hybrid model that bridges the physical and digital worlds. The digital RAW file remains your master negative, the source of all value, while the signed, limited-edition archival print becomes the collectible artifact. This approach gives collectors what they’ve always wanted: a beautiful, tangible object to hang on their wall, imbued with rarity and the artist’s signature.
You can enhance this offering by creating a complete collector’s package. This might include:
- A museum-quality, archival pigment print, signed and numbered by you.
- A certificate of authenticity that details the print number, date, and technical specifications.
- Secure access to the master digital file through a private online gallery, confirming its provenance.
- Options for modern display, such as high-quality digital frames (like a Meural or Samsung’s The Frame) that can showcase a dynamic collection.
This combination of a physical object and a verified digital original provides the best of both worlds. It honors the tradition of the fine art print while embracing the technology of the digital age.
This entire process hinges on the skills discussed previously. A perfect print is only possible with a perfectly calibrated monitor, a deep understanding of your RAW files, and a masterful command of your digital darkroom workflow. The print is not a byproduct of your digital work; it is its culmination and the ultimate validation of your craft.
Your journey from film to digital is a personal one. Start today by choosing one area from this guide—be it color calibration or your backup strategy—and begin building the digital darkroom that truly reflects your artistic voice.