True studio safety isn’t about better ventilation for toxic acids; it’s about re-engineering your etching process as a controlled electrochemical system that eliminates hazards at their source.
- Saline sulfate electro-etching offers molecular-level precision, creating clean, straight-walled lines that acid baths cannot replicate.
- Modern acrylic grounds and the Edinburgh Etch method eliminate the need for carcinogenic asphaltum and the risks of vertical acid tanks.
Recommendation: Transition from managing hazardous chemicals to controlling a predictable system by starting with saline sulfate electro-etching for its superior results and inherently safer, closed-loop workflow.
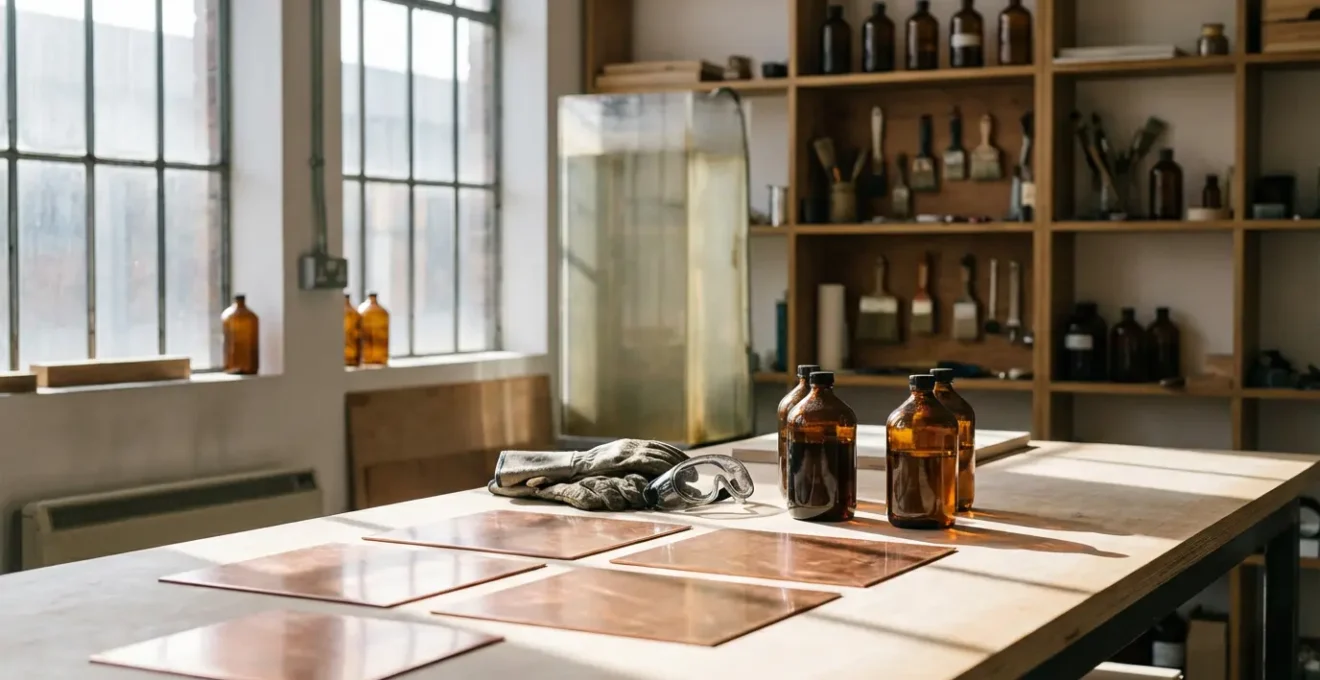
For generations of printmakers, the intoxicating aroma of nitric acid was the smell of creation itself, a hazardous but accepted part of the intaglio process. The pursuit of a deep, velvety line on a copper plate often came at the cost of exposure to corrosive fumes and carcinogenic materials. The common advice has always been to mitigate these risks: wear better gloves, install a powerful fan, or switch to the marginally safer ferric chloride. But these are merely precautions, not solutions. They manage the danger rather than eliminating it.
This approach is fundamentally outdated. What if the key to a truly safe studio wasn’t just swapping one dangerous chemical for a slightly less-dangerous one, but in fundamentally rethinking the entire workflow? The modern, eco-conscious printmaker can move beyond the brute-force chemistry of the past and embrace a new paradigm: etching as a controlled electrochemical system. This is not about compromising on quality for the sake of safety; it is about achieving superior, more predictable results because of it.
This guide deconstructs the non-toxic etching process, moving from the molecular science of mordants and grounds to the practicalities of waste disposal and press calibration. We will explore how controlling variables like voltage, temperature, and chemical concentration allows you to move from guesswork to predictable, repeatable outcomes. By treating your studio as a laboratory, you can eliminate hazards at their source and produce cleaner, sharper lines than ever before.
text
This article provides a complete roadmap for transforming your intaglio practice into a model of safety and precision. The following sections break down each critical stage, from understanding your mordant to achieving the perfect print.
Summary: A Guide to Non-Toxic, Precision Intaglio
- Why Ferric Chloride is safer than Nitric Acid but requires vertical tanks?
- How to apply hard ground that doesn’t chip without using asphaltum?
- Saline Sulfate Electro-etch vs. Traditional Acid: Which bites a cleaner line?
- The disposal mistake that contaminates local water and brings heavy fines
- How to calculate etching time based on temperature to avoid under-bitten plates?
- Why your patina flakes off: the importance of torch temperature control
- The “hot etch” mistake that burns the image off the stone forever
- How to Calibrate Your Etching Press Pressure for Consistent Deep Blacks?
Why Ferric Chloride is safer than Nitric Acid but requires vertical tanks?
The primary advantage of ferric chloride (FeCl₃) over nitric acid (HNO₃) is its reduced toxicity. It doesn’t release the corrosive, toxic nitrogen dioxide fumes that are a hallmark of acid etching, making it a significant step forward for studio air quality. However, its traditional application introduces a mechanical problem. As ferric chloride etches copper, it produces an iron oxide sludge. In a standard horizontal tray, this heavy sediment settles onto the plate, blocking the mordant from reaching the metal and causing an uneven, weak bite. This is why many studios adopt vertical tanks with air pumps—to keep the solution agitated and the sludge suspended.
But this “solution” simply trades a chemical hazard for a logistical one. A far more elegant innovation is the Edinburgh Etch, developed by Friedhard Kiekeben. This method re-engineers the chemistry itself. By adding a specific amount of citric acid to the ferric chloride solution, the process of chelation is initiated. The citric acid bonds with the iron oxide particles as they form, keeping them in suspension as a light, non-obstructive precipitate. This allows for reliable, even etching in a simple horizontal tray, eliminating the need for bulky, spill-prone vertical tanks.
As Spark Box Studio found in their long-term use of non-toxic systems, this method provides consistent results. The traditional vertical tank setup uses aeration from something as simple as a fish aquarium pump to create natural convection, ensuring a continuous flow of fresh mordant over the plate’s surface. The Edinburgh Etch achieves the same goal through chemistry rather than mechanics, representing a more sophisticated level of process control.
How to apply hard ground that doesn’t chip without using asphaltum?
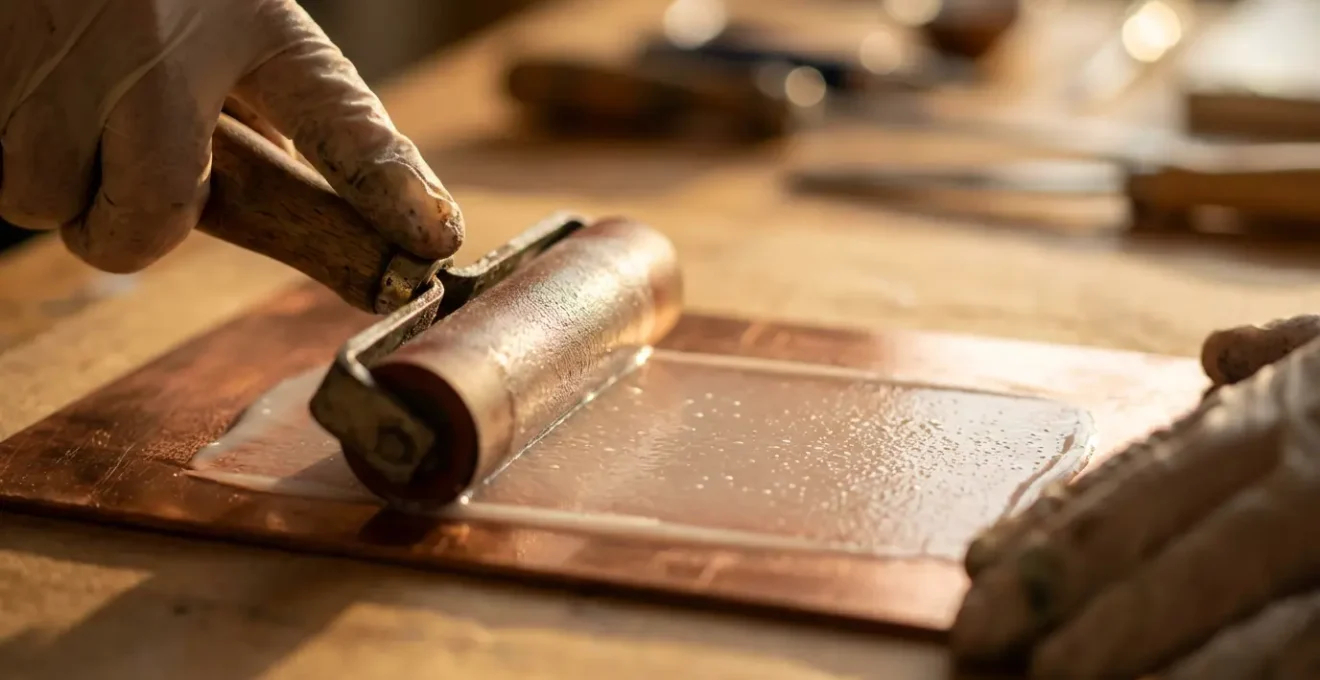
Moving away from toxic mordants is only half the battle; the grounds used to resist them are equally important. Traditional hard grounds often contain asphaltum or bitumen, substances that release hazardous vapors and carry a cancer risk. The modern alternative is a range of acrylic-based liquid grounds. However, their performance is not universal; success depends on understanding the material science of compatibility between the ground and the mordant.
An acrylic ground’s primary failure point is chipping or flaking, which exposes the plate and ruins the image. This is often caused by improper application (a layer that is too thick and brittle) or a chemical mismatch with the etching bath. For example, some grounds that perform flawlessly in ferric chloride may soften or lift in a saline sulfate solution. The key is to select a ground specifically tested for your chosen mordant and to apply it as a thin, even, and flexible film. Using a brayer or roller, rather than a brush, is a professional technique for achieving this consistency.
The following table, based on extensive studio testing, illustrates the compatibility and performance of popular non-toxic grounds with different modern etching solutions. It serves as a practical guide for making an informed choice based on your specific workflow.
| Ground Type | Ferric Chloride | Edinburgh Etch | Saline Sulfate | Chip Resistance |
|---|---|---|---|---|
| Lascaux Acrylic | Excellent | Excellent | Good | High with roller application |
| BIG Ground | Good | Excellent | Moderate | Best with airbrush |
| Future Floor Polish | Good | Good | Poor | Moderate with thin coats |
| Golden Acrylic | Excellent | Excellent | Good | High with brayer |
Even with perfect application, accidents happen. Unwanted scratches can be repaired before etching by carefully applying a small amount of liquid ground with a fine brush (size 0 or 00) and allowing it to dry completely. For complete ground removal without toxic solvents, a simple soda ash solution is highly effective and environmentally safe.
Saline Sulfate Electro-etch vs. Traditional Acid: Which bites a cleaner line?
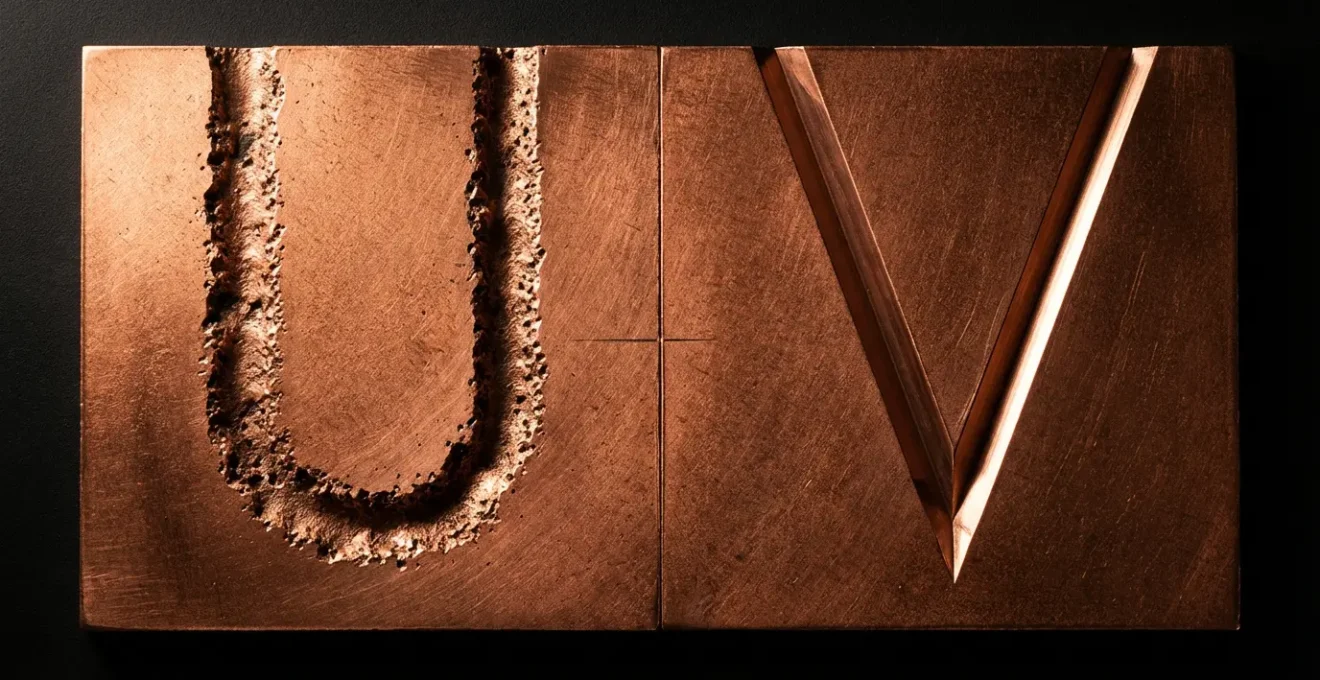
Saline sulfate electro-etching represents the pinnacle of the “electrochemical system” approach. Instead of using a corrosive mordant to chemically burn away metal, this process uses a low-voltage electrical current in a safe saline solution (copper sulfate and sodium chloride) to precisely lift copper ions from the plate. This is not a less-toxic alternative; it is a fundamentally different and more controlled process. The most significant advantage is the quality of the line. Acid etching is an aggressive, lateral process that creates “undercutting”—the acid eats sideways under the ground, resulting in a rough, U-shaped groove that can weaken fine lines.
Electro-etching, by contrast, is a directional, anodic process. The electrical current pulls metal ions straight up, away from the plate, resulting in a perfectly clean, straight-walled V-shaped groove. This preserves the integrity of the most delicate details and creates lines that print with exceptional sharpness and clarity. The level of control is remarkable. According to specialists, the DC voltage required is extremely low; a study notes that for a 15% salt solution, you need only 2-3 volts DC to run the process. Maintaining this low voltage prevents unwanted secondary reactions and ensures a clean etch.
This method transforms etching from an art of approximation into a science of precision. Instead of relying on visual checks and intuition, the printmaker controls the depth and quality of the bite through measurable inputs: voltage, amperage, and time.
Case Study: Alfonso Crujera’s Micro-Etch Line Quality Comparison
Pioneering artist Alfonso Crujera has documented the superior control offered by electro-etching. He reports achieving a printable line on small plates after just 15 minutes of electrolysis using an incredibly low voltage of 0.5 volts. By conducting step tests at 15-minute intervals, a printmaker can create a personal reference chart that correlates etching time directly to line intensity. His microscopic analysis confirms that electro-etched lines exhibit clean, straight-walled profiles, completely free of the characteristic undercutting and foul-biting associated with traditional acid etching.
The disposal mistake that contaminates local water and brings heavy fines
One of the most critical, yet often overlooked, aspects of studio safety is waste disposal. Simply pouring spent mordant down the drain is not only environmentally catastrophic but can also lead to severe fines for contaminating local water systems. The copper ions suspended in spent ferric chloride or electro-etching solutions are toxic to aquatic life. Responsible disposal is a non-negotiable part of a professional printmaking practice. For ferric chloride, this means a process of neutralization and solidification. The spent mordant must first be neutralized with an alkali like sodium carbonate (soda ash), then the resulting copper-laden sludge must be separated, dried, and solidified before it can be turned over to a hazardous waste facility.
While this method contains the hazard, the electro-etching process offers an even better solution: the creation of a closed-loop workflow. As described by SNAG (Society of North American Goldsmiths), electro-etching solutions are largely self-perpetuating. The process generates a by-product that can be reused in the reaction. As a result, the bath can be maintained for years with minimal upkeep, primarily just topping off evaporated water. According to their technical analysis, this closed-loop approach virtually eliminates hazardous waste generation. This shifts the paradigm from “safe disposal” to “waste elimination,” the ultimate goal of an eco-conscious studio.
Action Plan: Step-by-Step Copper Sludge Dewatering and Solidification
- Neutralize spent ferric chloride or Edinburgh Etch by gradually adding sodium carbonate (soda ash) solution until fizzing stops completely.
- Filter the neutralized solution through coffee filters or a dedicated filter press to separate the copper-laden sludge from the now copper-free liquid.
- Allow the filtered sludge to air-dry completely. For faster results, use a low-heat evaporation method to reduce its volume by up to 90%.
- Mix the completely dried sludge with plaster of Paris or Portland cement at a 1:3 ratio (1 part sludge to 3 parts cement) to create inert, solid blocks.
- Dispose of the solidified blocks as solid hazardous waste through your local HHW (Household Hazardous Waste) or SQG (Small Quantity Generator) program.
This checklist provides a clear, compliant method for handling ferric chloride waste. However, the elegance of the closed-loop electro-etching system is a compelling reason to consider it the superior long-term solution.
How to calculate etching time based on temperature to avoid under-bitten plates?
A common frustration in etching is inconsistency. A plate etched for 30 minutes on a warm day may look perfect, while another etched for the same duration in a cold studio is disappointingly under-bitten. This is because etching is a chemical reaction, and its speed is highly dependent on temperature. Instead of treating this as a source of random error, the scientific printmaker treats it as a controllable variable. By understanding and measuring temperature, you can achieve predictive, repeatable etching times.
For ferric chloride and Edinburgh Etch, the relationship is direct: higher temperatures accelerate the reaction. A simple thermometer and a reference chart can transform your process from guesswork to a calculated procedure. By establishing a baseline time at a standard temperature (e.g., 18°C / 64°F), you can use a multiplier to accurately adjust your etching duration for any given studio condition. This simple tool empowers you to produce consistent plates day after day.
This principle of predictable calculation is even more precise in electro-etching. Here, the depth of the etch is a direct function of both time and electrical current. The relationship can be expressed with almost mathematical certainty. As detailed by Alfonso Crujera in his research, the depth of electro-etched lines is directly proportional to the current (in amps) multiplied by the time (in seconds). By controlling the voltage and monitoring the amperage, the printmaker has direct, granular control over the final result, making it the most predictable etching method available.
| Temperature | Ferric Chloride 42°Bé | Edinburgh Etch | Time Multiplier |
|---|---|---|---|
| 15°C (59°F) | 60 min baseline | 45 min baseline | 1.4x |
| 18°C (64°F) | 45 min | 35 min | 1.0x (baseline) |
| 25°C (77°F) | 30 min | 23 min | 0.7x |
| 30°C (86°F) | 22 min | 17 min | 0.5x |
Why your patina flakes off: the importance of torch temperature control
After a successful etch, the final finish of the plate—its patina—can make or break the artwork. A common and frustrating failure is when a beautifully colored patina flakes off, revealing the raw copper beneath. The cause is often mistakenly attributed to the patina solution itself, but the root problem usually lies in a lack of molecular-level surface preparation and temperature control. Copper plates etched in ferric-based solutions develop a tarnish, a thin layer of oxide, almost immediately upon exposure to air. Applying a patina over this unstable layer is like painting on dust; it has nothing to securely bond to.
Furthermore, when applying hot patinas with a torch, excessive heat causes a critical chemical change on the copper’s surface. As one study on oxide formation notes, maintaining torch temperature below 300°C is critical. Above this threshold, you don’t just warm the metal; you create a thick, brittle layer of black cupric oxide. This layer is weakly bonded to the copper below and will inevitably flake off, taking your patina with it. The solution is twofold: meticulous cleaning and precise temperature control.
A more controlled and reliable method is the application of cold patinas. This approach avoids the risk of creating a brittle oxide layer altogether.
- First, the etched plate must be de-oxidized. A simple and effective method is to clean the surface with a vinegar-salt solution to remove all tarnish.
- Next, apply a commercial cold patina solution (like Jax or Sculpt Nouveau) at room temperature with a brush or spray.
- Build the color in thin, successive layers, allowing each to dry completely before applying the next. This creates a deep, stable color.
- Finally, seal the finished, dry patina with a microcrystalline wax (like Renaissance Wax) to protect it and prevent future flaking.
The “hot etch” mistake that burns the image off the stone forever
The term “hot etch” describes a runaway chemical reaction, a situation where the mordant becomes overly aggressive, destroying fine details and effectively “burning” the image off the plate. This is not a random accident but a predictable outcome of poor chemical control. It typically occurs when the concentration of the mordant is too high or when it’s used at an excessively high temperature. For ferric chloride, research has shown that there is an optimal concentration for a controlled etch. One academic paper highlights that the etch rate reaches its maximum at about 2M FeCl₃; concentrations above 3M can lead to these uncontrollable, aggressive reactions.
Relying on a single, long etch to achieve deep blacks is a gamble that risks a “hot etch.” A far more controlled and professional technique is staged biting. This method involves a series of short, successive etches, with more stop-out varnish being applied between each stage. By building up tones incrementally, the printmaker retains complete control over the process, protecting the lightest areas while methodically deepening the darks. This technique replaces a high-risk, single-shot approach with a low-risk, strategic process that yields superior tonal range.
The staged biting technique is a clear example of procedural control overcoming brute-force chemistry. Here is a typical workflow for achieving a full tonal range:
- Apply an initial aquatint (e.g., acrylic airbrushed to 60-70% coverage) across the entire plate.
- Using a stop-out varnish, paint out any areas that are to remain pure white.
- Perform a very short initial etch (e.g., 20 seconds) to establish the lightest gray tones.
- Remove the plate, rinse, and dry it. Then, apply more stop-out to protect the areas you wish to keep at that lightest gray.
- Etch again for a longer duration (e.g., 2 minutes) to create the next step in the tonal scale.
- Repeat this process of stopping out and etching with progressively longer times (e.g., 5 min, 10 min, 20 min) until the deepest blacks are achieved.
Key takeaways
- True safety comes from systemic control, not just managing toxic materials. Re-engineering your workflow with non-toxic chemistry eliminates hazards at their source.
- Electro-etching provides superior molecular control, producing clean, sharp V-shaped lines that are impossible to achieve with the lateral undercutting of acid.
- Predictability is key. By controlling variables like temperature, chemical concentration, and voltage, you can transform etching from guesswork into a repeatable science.
How to Calibrate Your Etching Press Pressure for Consistent Deep Blacks?
The final step in the intaglio process—pulling the print—is as critical as the etch itself. Achieving consistent, rich, deep blacks is not just about the depth of the line on the plate; it’s about the perfect transfer of ink from that line to the paper. This requires precise calibration of your etching press pressure. Too little pressure, and the paper won’t be pushed deep enough into the lines to pick up all the ink, resulting in a weak, gray print. Too much pressure, and you can damage the paper or even the plate, causing “plate tone” where the surface itself begins to print.
A simple yet effective method for diagnosing and calibrating your press is the “star pattern” test. By arranging strips of felt in a star shape and running them through the press with a sheet of newsprint, you create a map of your press’s pressure. The depth of the embossment on each ray of the star should be identical. If one side is lighter, it indicates that the pressure is uneven, and the press screws on that side need to be tightened incrementally until a uniform impression is achieved.
The shape of the etched line also dictates pressure requirements. As Spark Box Studio discovered, the clean, V-shaped lines created by electro-etching behave differently than the U-shaped grooves from acid. To get a full transfer of ink, their protocol found that these V-shaped lines require harder blanket combinations and approximately 10-15% more pressure to achieve deep blacks equivalent to those from traditional plates. This demonstrates again how the entire process is an interconnected system, where a change in etching methodology necessitates a corresponding adjustment at the press.
By adopting this systemic, scientific approach—from ground selection to press calibration—you move beyond simply making prints. You are engineering them. This methodology not only creates a safer studio environment, free from the hazards of the past, but it also empowers you with a level of control and predictability that ultimately leads to stronger, more consistent, and more refined artwork. Start today by auditing your own process and introducing one of these controlled techniques to begin your transition to a safer, more precise printmaking practice.