The key to protecting art in a bright room isn’t just blocking UV light, but actively managing the four hidden environmental risks that cause irreversible damage.
- Light damage is cumulative and caused by both UV and visible light, making basic filtering insufficient over time.
- Humidity fluctuations cause more rapid physical damage—cracking and warping—than light fading.
Recommendation: Adopt a preventive conservation mindset. Focus on creating a stable environment by controlling humidity, using archival materials, and performing informed maintenance.
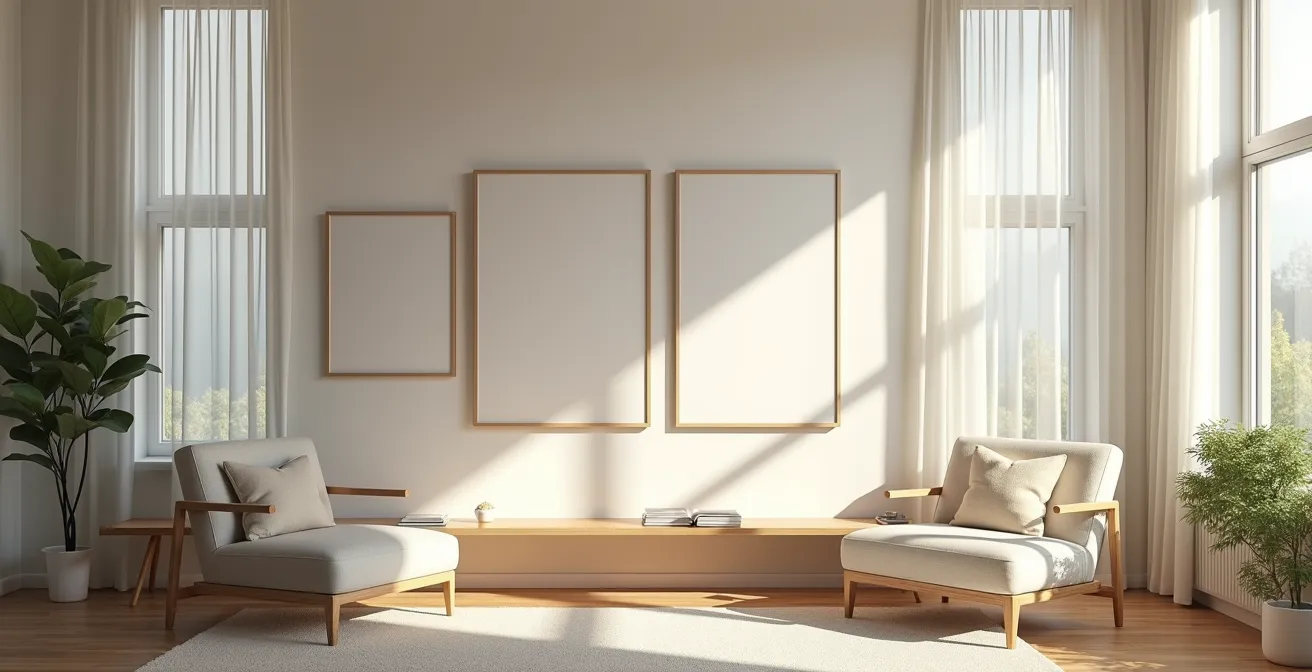
As a collector, you face a frustrating dilemma: you want to live with and enjoy your beautiful art, but the sun-drenched living room that brings you joy is a direct threat to the longevity of your collection. You’ve likely been told the standard advice is to install UV-filtering glass or hang pieces away from direct sun. While these are good first steps, they are fundamentally incomplete and create a false sense of security. They address only a fraction of the problem and ignore the more insidious, slow-acting agents of decay that professional conservators spend their careers managing.
The truth is, damage to art is rarely a single catastrophic event. It is a slow, cumulative process driven by an unstable environment. Factors like subtle humidity swings, the chemical composition of your framing materials, and even the way you dust can cause more harm over five years than a single afternoon of direct sunlight. The professional approach isn’t about finding one magic bullet like UV glass; it’s about holistically managing the entire ecosystem around the artwork.
But what if the real secret to preserving your art wasn’t just about blocking something out, but about actively controlling the environment within? This guide will shift your perspective from simple protection to active, preventive conservation. We will explore the professional-grade techniques used in museums and adapt them for your home, focusing on the interconnected threats of humidity, pests, light, and improper handling. You will learn to think like a conservator, enabling you to enjoy your art in any room, confident in its long-term preservation.
This article breaks down the core principles of home conservation, moving from the invisible threats in the air to the physical materials touching your artwork. Follow this structured guide to build a comprehensive strategy for protecting your collection.
Summary: A Home Conservator’s Guide to Art Preservation
- Why Even a 5% Humidity Fluctuation Can Ruin an Oil Painting in 48 Hours?
- How to place an 18th-century commode in a modern heated home without cracking the veneer?
- Why UV filtering glass is not enough to stop all light damage?
- How to identify a silverfish infestation behind your framed prints?
- Acid-free vs. buffered matting: Which protects your photograph for 50 years?
- The cleaning mistake that drives dirt deeper into the canvas weave
- The cleaning error that strips gold leaf off antique frames instantly
- How to store oil paintings in a closet without causing mold or warping?
Why Even a 5% Humidity Fluctuation Can Ruin an Oil Painting in 48 Hours?
Before worrying about light, conservators first stabilize the air. Oil paintings are complex, layered objects, and each layer is made of a different material that reacts to moisture in the air at a different rate. These materials are hygroscopic, meaning they absorb and release moisture, causing them to expand and contract. When humidity fluctuates, a war begins within the painting. The canvas, typically made of hygroscopic linen or cotton, can expand quickly, while the less-flexible gesso and oil paint layers cannot keep up. This differential stress is what causes microscopic cracking, flaking, and “tenting,” where the paint layer lifts off the canvas.
A single day with a hot, sunny morning (low humidity) followed by a cool, rainy evening (high humidity) can induce a full cycle of expansion and contraction, stressing the paint film. A 5% swing in relative humidity (RH) is enough to initiate this process. Repeated over weeks and months, these cycles inevitably lead to visible, irreversible damage. This is why a stable environment is more critical than a dark one. A painting in a room with a constant 50% RH, even with moderate light, is far safer than one in a dark, damp basement with wild humidity swings.
The table below, based on conservation principles, illustrates how each material layer in a typical oil painting responds differently to humidity changes, creating the internal stresses that lead to damage.
| Material Layer | Expansion Rate | Response Time | Damage Type |
|---|---|---|---|
| Canvas (cotton/linen) | High (hygroscopic) | 2-4 hours | Stretching/sagging |
| Gesso ground | Medium | 4-8 hours | Cracking |
| Oil paint layer | Low (non-hygroscopic) | Minimal | Flaking, tenting |
| Wood stretchers | High | 6-12 hours | Warping |
Therefore, your first act as a home conservator is to purchase a reliable hygrometer to monitor the RH in your display area. Aim for a stable level, ideally between 40-55%, and avoid placing art near sources of fluctuation like vents, radiators, or drafty windows.
How to place an 18th-century commode in a modern heated home without cracking the veneer?
The same principles of humidity control apply to all organic materials, especially antique wooden furniture. An 18th-century commode was built in an era of uninsulated homes with fireplaces, where humidity changes were gradual and seasonal. Placing it in a modern, centrally-heated home creates a drastically different environment. Dry winter heating can lower the relative humidity to 20% or less, causing the wood to shrink rapidly. This is particularly devastating for veneered pieces, as the thin decorative veneer and the thicker base wood shrink at different rates, causing the veneer to crack, lift, and delaminate.
The solution is not to turn off your heat, but to create a more stable micro-climate for the piece. First, position the commode away from direct heat sources like radiators or HVAC vents and out of direct sunlight, which creates localized hot, dry spots. Next, actively manage the humidity in its immediate vicinity. According to preventive conservation guidelines, the ideal environment for wooden artifacts is around 55% humidity and 20°C (68°F). While maintaining this for an entire house is difficult, you can achieve it locally.
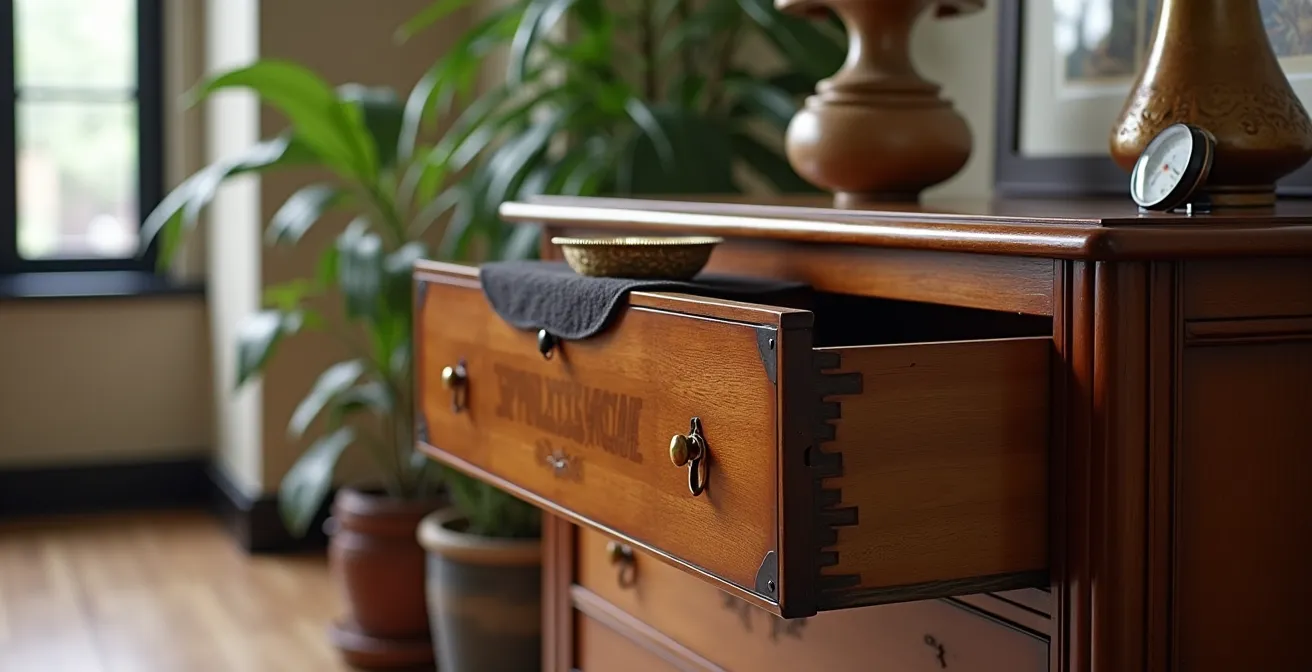
A simple, non-invasive method is to place a small, shallow container of water or water-absorbing gel beads inside a drawer or on the bottom shelf of the piece. This will gently release moisture and buffer the immediate area against the home’s dry air. Use your hygrometer to monitor the conditions near the furniture and adjust as needed. This small effort transforms a hostile environment into a stable sanctuary for your antique.
By thinking about the object’s specific needs rather than the room as a whole, you can successfully integrate delicate historical pieces into a contemporary living space without sacrificing their integrity.
Why UV filtering glass is not enough to stop all light damage?
Light damage is the most well-known threat to art, but it’s also the most misunderstood. The common belief is that UV rays are the sole culprit, and that “UV-filtering” glass or acrylic is a complete solution. This is dangerously inaccurate. Light damage is caused by the entire spectrum of light, including visible light, and its effect is cumulative and irreversible. Every photon that strikes a pigment causes a tiny, permanent chemical change. Over time, these changes manifest as fading, yellowing, or darkening.
UV-filtering glazing is essential, as UV is the most energetic and damaging part of the spectrum. However, it typically blocks only 99% of UV rays and does nothing to stop the millions of photons from the visible spectrum that also contribute to fading. The intensity and duration of exposure matter immensely. As conservation experts note, the damage from just 1 hour in direct sunlight can be equivalent to more than 200 hours under standard museum lighting. A sunny room, even without direct sun on the artwork, bombards it with high levels of ambient visible light all day long.
Furthermore, the type of light source matters. A 2016 study in *Studies in Conservation* found that older fluorescent tube lights caused significantly more color change than modern LED or halogen lamps, even when UV was filtered. This proves that focusing only on UV ignores the real-world impact of the visible light that fills our homes. True light management means reducing the overall “light dose”—a combination of intensity and duration.
Instead of relying solely on glazing, use layered strategies: hang sensitive works on walls that receive the least ambient light, use sheer curtains to cut down on daytime intensity, and ensure your home lighting uses high-quality, low-UV LEDs. This holistic approach is the only way to truly slow the inevitable process of light damage.
How to identify a silverfish infestation behind your framed prints?
While you focus on the environment in front of the artwork, threats can be silently growing behind it. Dark, undisturbed spaces with moderate humidity, like the cavity behind a framed picture, are ideal breeding grounds for pests like silverfish. These insects feed on the cellulose in paper, the starches in mounting adhesives, and even some pigments. An infestation can go unnoticed for years, causing devastating damage before it’s discovered.
Early detection is crucial. You don’t need to unframe every piece; instead, learn to spot the subtle tell-tale signs from the outside. Look closely at the inside edge of the mat board through the glass. Do you see any new, unexplained tiny brown or yellow stains, a phenomenon known as “foxing”? Are there any dark specks that look like miniature pepper flakes (“fly specks”)? These can be signs of insect activity. Another clue is a faint, rippled, or uneven appearance on the paper’s surface, which can indicate where insects have been “grazing” on the paper from behind.
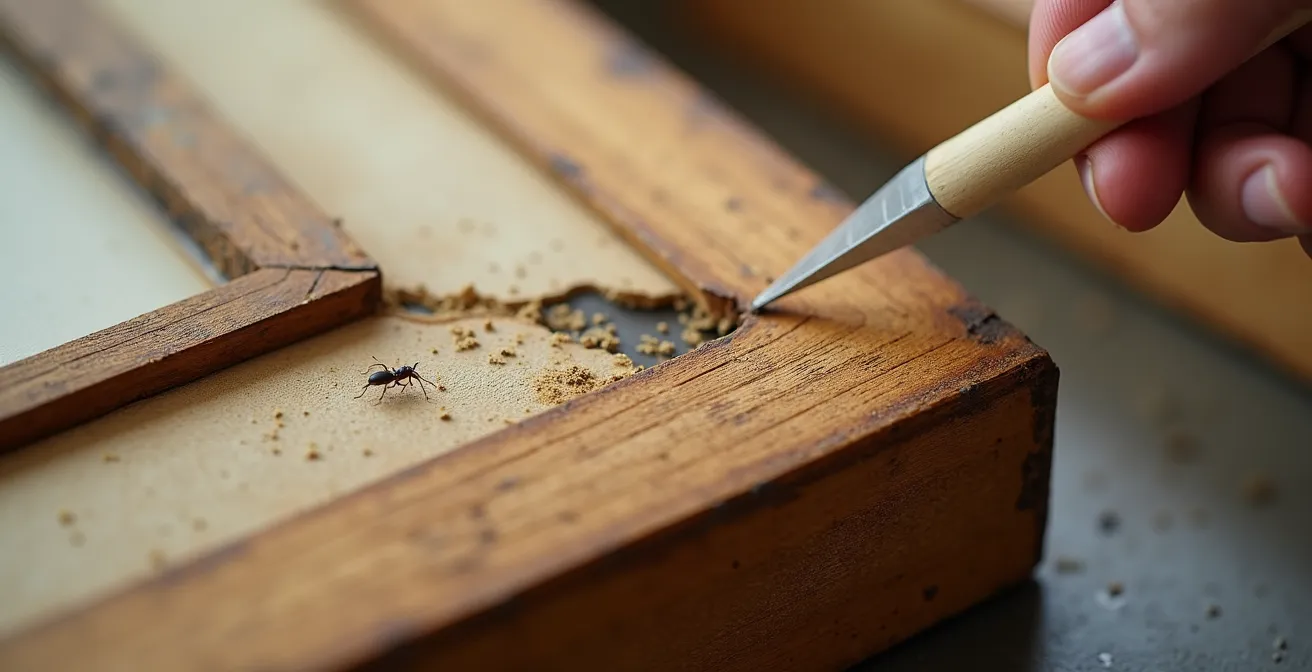
If you suspect an issue, you must perform a more thorough inspection. In a clean, dry area, carefully place the artwork face down and remove the backing board. Inspect the corners and edges of the artwork and backing for insect droppings (frass), cast-off skins, or the insects themselves. Look for “grazing trails” where the surface of the paper has been eaten away. If you find evidence of an active infestation, isolate the artwork in a sealed plastic bag and consult a professional art conservator immediately. Do not attempt to use commercial pesticides, as they can cause irreversible chemical damage to the artwork.
To prevent infestations in the first place, ensure your home’s humidity is not excessively high and that frames are properly sealed with high-quality backing boards and framing tape, leaving no gaps for pests to enter.
Acid-free vs. buffered matting: Which protects your photograph for 50 years?
The materials touching your artwork are just as important as the air surrounding it. When framing a work on paper or a photograph, the mat board is not just decorative; it is the first line of defense against environmental pollutants and internal degradation. However, not all mat boards are created equal. The most common mistake is assuming that any “acid-free” mat is sufficient. The reality is more nuanced, and choosing the wrong type can cause your art to self-destruct over time.
Paper and board made from wood pulp contain lignin, a compound that breaks down into acid, causing yellowing, brittleness, and “mat burn”—a dark, discolored line on the artwork where it touches the mat. True archival matting is made from materials like cotton rag that are naturally acid-free and lignin-free. However, there’s another level of protection: buffering. A buffered mat contains an alkaline reserve (like calcium carbonate) that actively neutralizes acids that migrate from the environment or from the artwork itself. This is ideal for most works on paper, like lithographs and drawings.
However, this buffering agent can be harmful to certain types of photographs. Protein-based photographic processes, like albumen prints (common in the 19th century) or some contemporary C-type prints, can be damaged by a high-pH environment. For these specific items, a neutral, unbuffered acid-free mat is the safer choice. Knowing what you have is key to protecting it for the long term.
The following table, drawing from conservation best practices, provides a clear guide for selecting the right material for your art. For any piece of significant value, consulting a professional framer who understands these distinctions is essential.
| Mat Type | pH Level | Best For | Avoid For | Lifespan |
|---|---|---|---|---|
| Acid-Free (Unbuffered) | 7.0 (Neutral) | Albumen prints, C-type photos | Paper art needing acid protection | 25-30 years |
| Buffered (Alkaline Reserve) | 8.5-9.5 | Lithographs, paper art, drawings | Protein-based photographs | 50+ years |
| 100% Cotton Rag | 7.0-8.5 | Museum-quality archival storage | None | 100+ years |
When in doubt, choosing a 100% cotton rag mat (which can be either buffered or unbuffered) is the highest standard, providing the purest material environment for your artwork and ensuring its preservation for generations.
The cleaning mistake that drives dirt deeper into the canvas weave
A dusty painting can look dull, and the instinct to clean it seems natural. However, this is one of the most dangerous moments for a private collector. The most common and devastating cleaning mistake is using any form of moisture—even a damp cloth with just water—on an unvarnished painting or one with a cracked varnish layer. This seemingly harmless act can cause permanent, irreversible damage.
As museum conservators warn, moisture acts as a vehicle. It combines with the surface layer of dust, grime, and soot and carries it down through the microscopic pores and cracks in the paint and varnish. This slurry of dirt then becomes trapped deep within the porous gesso ground layer beneath the paint. Once embedded, it is impossible to remove without highly specialized conservation treatment, if at all. You have effectively driven the dirt *into* the painting’s structure.
Professional conservators, by contrast, use meticulous dry methods or highly controlled chemical processes. One fascinating technique involves using human saliva, a surprisingly effective enzymatic cleaner. At institutions like the Museum of Fine Arts, Houston, conservators apply saliva with cotton swabs in a gentle rolling motion. This lifts the grime off the surface without driving it in. They often use tools like UV fluorescence imaging beforehand to identify the varnish type and any previous restorations, ensuring their cleaning method is appropriate for that specific artwork. This level of analysis highlights the chasm between a quick wipe-down and a professional cleaning.
For home care, the only truly safe method for cleaning a painting’s surface is to gently dust it with a very soft, natural-bristle brush (like a sable or goat-hair brush), directing the dust away from the surface. If a painting is significantly dirty, it requires the attention of a professional conservator—no exceptions.
The cleaning error that strips gold leaf off antique frames instantly
Just as the canvas is vulnerable, the frame requires its own specialized care, especially if it is an antique with a gilded (gold leaf) surface. The brilliant shine of a water-gilded frame is incredibly fragile. It is not a solid layer of metal but rather micro-thin sheets of gold applied over a carefully prepared base of gesso (a chalk and glue mixture) and bole (a colored clay). This delicate structure is acutely sensitive to one thing: liquid.
The single most destructive error is attempting to clean a gilded frame with a commercial cleaner (especially one containing ammonia) or even just a cloth dampened with water. As conservation specialists from Fine Art Restoration UK explain, “any liquid…can dissolve the gesso and bole layers under water-gilded frames, causing the gold leaf to detach instantly.” The water soaks through the microscopic cracks in the gold leaf, turns the underlying clay and chalk base into mud, and the gold simply floats away or peels off at the slightest touch.
The damage is immediate and catastrophic. Again, this is where professional techniques diverge completely from home-based intuition. Conservators might use UV light to examine a frame before cleaning, as different layers of original gilding, historical repairs, and modern touch-ups fluoresce differently. This allows them to understand the frame’s history and structure before a single tool touches it, preventing them from using a method that could damage a fragile original surface.
Any liquid, especially ammonia-based cleaners or even water, can dissolve the gesso and bole layers under water-gilded frames, causing the gold leaf to detach instantly.
– Conservation specialists, Fine Art Restoration UK
For routine maintenance at home, the only safe method is the same as for a canvas: a very light dusting with a soft, dry, natural-bristle brush. Never rub, and never, ever use liquids. If a frame is truly dirty or damaged, it is a job exclusively for a professional frame conservator.
Key Takeaways
- Damage is a System, Not an Event: Lasting art preservation comes from managing the total environment—light, humidity, and materials—not from a single solution like UV glass.
- Stability Over Darkness: A stable relative humidity (40-55%) is more critical for preventing the physical cracking and warping of paintings and furniture than a dark room.
- Clean Dry, Not Wet: The only safe way for a collector to clean a painting or a gilded frame is with a soft, dry brush. Any moisture can cause permanent, embedded damage.
How to store oil paintings in a closet without causing mold or warping?
Properly displaying your art is only half the battle; properly storing it is just as crucial. Whether you are rotating your collection, moving, or simply have more art than wall space, a common closet can seem like a convenient storage spot. However, a closet can also be a perfect environment for mold, pests, and physical damage if you don’t follow professional storage protocols. Stagnant air, proximity to humid exterior walls, and improper stacking can quickly ruin a painting.
The goal of storage is to maintain the same stable, clean, and dark environment you would strive for in a display area. Never wrap paintings in plastic sheeting or bubble wrap for long-term storage. Plastic traps moisture, creating a micro-climate perfect for mold growth. Instead, use a breathable material like an old, clean cotton sheet or archival Tyvek. This protects from dust while allowing air to circulate. Furthermore, paintings should always be stored vertically, as if they were on a wall. Stacking them flat, one on top of another, puts pressure on the canvas, causing it to sag and warp over time.
A well-organized storage rack is ideal, but if you must lean them against a wall, take specific precautions. Place them on padded blocks to lift them off the floor, which protects them from potential water damage and improves air circulation. When storing multiple pieces together, always use rigid separators made of acid-free cardboard or mat board between them to protect the surfaces. Arrange them either face-to-face or back-to-back to prevent hanging hardware from one painting from denting the canvas of another.
Action Plan: Your Professional Oil Painting Storage Checklist
- Choose Breathable Wrapping: Never use plastic. Wrap each painting individually in breathable materials like clean cotton sheets or archival Tyvek to prevent moisture buildup and mold.
- Store Vertically, Never Flat: Always position paintings upright to prevent the canvas from sagging and the frame from warping under its own weight.
- Separate and Protect Surfaces: Store paintings face-to-face or back-to-back, using acid-free cardboard separators between each piece to prevent scratches and dents.
- Elevate Off the Floor: Place paintings on padded blocks or in a rack to raise them off the floor, protecting them from dust, pests, and potential water damage.
- Avoid Exterior Walls & Temperature Swings: Store paintings against interior walls, away from sources of temperature and humidity fluctuations like vents, pipes, or uninsulated exterior walls.
By transforming your closet from a simple storage space into a controlled environment, you ensure your art is just as safe off the wall as it is on it. This completes the cycle of care and solidifies your role as a true custodian of your collection.