Achieving rich, dark intaglio prints is not about applying more force, but about systematic calibration of your entire press setup.
- Worn felts and incorrect pressure settings are the primary causes of weak, patchy prints as they fail to push the paper into the plate’s ink-filled grooves.
- Calibrating the press involves diagnosing material fatigue in your blankets and precisely setting the drum height for a given paper’s weight and moisture level.
Recommendation: Stop treating inconsistent prints as an ink or wiping problem and start diagnosing your press as a mechanical system, beginning with the health of your felts.
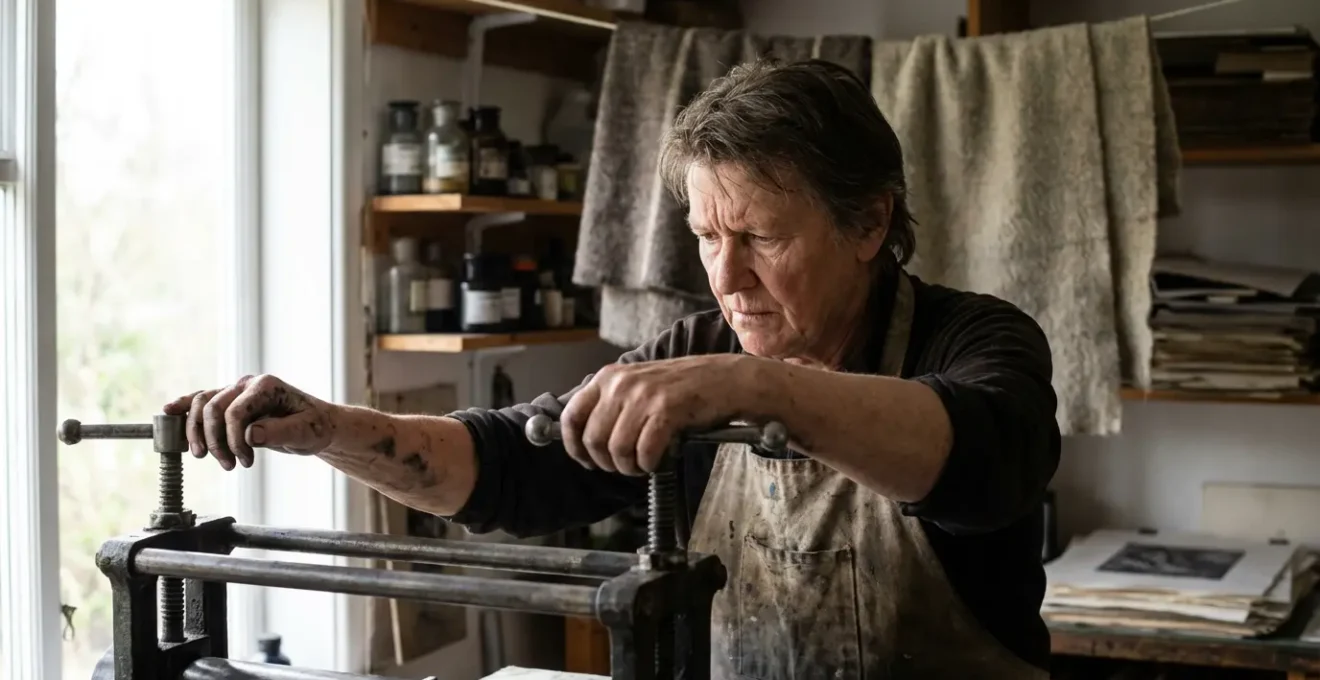
The frustration is familiar to every printmaker: after hours of meticulous work etching a plate, the moment of truth arrives. You peel the paper back, only to reveal a ghost of the image you envisioned—a composition of faint greys and patchy tones, not the deep, velvety blacks you were aiming for. The common advice is often to apply more pressure, use more ink, or adjust your wiping technique. While these are factors, they often treat the symptoms rather than the root cause. True consistency in intaglio printing comes from a more fundamental understanding of the press itself.
The key is to stop thinking of the press as a simple clamp and start seeing it as a precision instrument. Achieving consistent, deep blacks is not about brute force; it’s a systematic calibration of the entire press system. From the compression of the felts to the hygroscopic properties of the paper, each component is a critical variable in a mechanical equation. An error in one part of the system cannot be compensated for by simply cranking down the pressure handles. This creates a cascade of other problems, from crushed paper fibers to damaged plates.
This guide will deconstruct the intaglio printing process from a mechanical perspective. We will move beyond guesswork and into the realm of precise calibration. We will analyze how each component functions, how to diagnose failures, and how to adjust the system to achieve the desired result: a perfect, deep black print, every single time. We will even see how this systematic approach to tension and surface interaction applies to other critical studio practices.
This article provides a detailed breakdown of the critical components in your printing process. Below is a summary of the sections we will explore to help you diagnose and resolve issues with print quality, from the press itself to related studio techniques.
Summary: A Systematic Approach to Printmaking Calibration
- Why using worn-out felts prevents the paper from reaching into the plate grooves?
- How to adjust the drum height for different paper weights without crushing the plate?
- Soaked Paper vs. Dry Printing: Which picks up the finest aquatint details?
- The tension error that causes creases in the margin of your large prints
- When to stop wiping the plate: the subtle line between clean highlights and wiped-out tone?
- How to stretch raw linen tight enough without warping the frame?
- Why smooth bristol board rejects soft graphite layering?
- How to Etch Copper Plates Safely Without Toxic Acid Baths?
Why using worn-out felts prevents the paper from reaching into the plate grooves?
The blankets, or felts, are the critical interface between the mechanical force of the press roller and the delicate surface of your paper and plate. Their primary job is to act as a cushion, evenly distributing pressure and forcing the dampened paper into the finest ink-filled grooves of the intaglio plate. When felts are new, their fibers are resilient and springy. However, with repeated use, they suffer from material fatigue and become compressed, matted, and hard. This is the single most common reason for a gradual decline in print quality.
A worn-out felt loses its ability to cushion and conform. Instead of pushing the paper into the plate’s recesses, it acts more like a hard board, bridging over the grooves. The paper never makes full contact with the ink held in the lines and aquatint, resulting in a weak, grey, and incomplete transfer. The image below provides a clear macro comparison between the texture of a new, effective blanket and one that has suffered from significant compression.
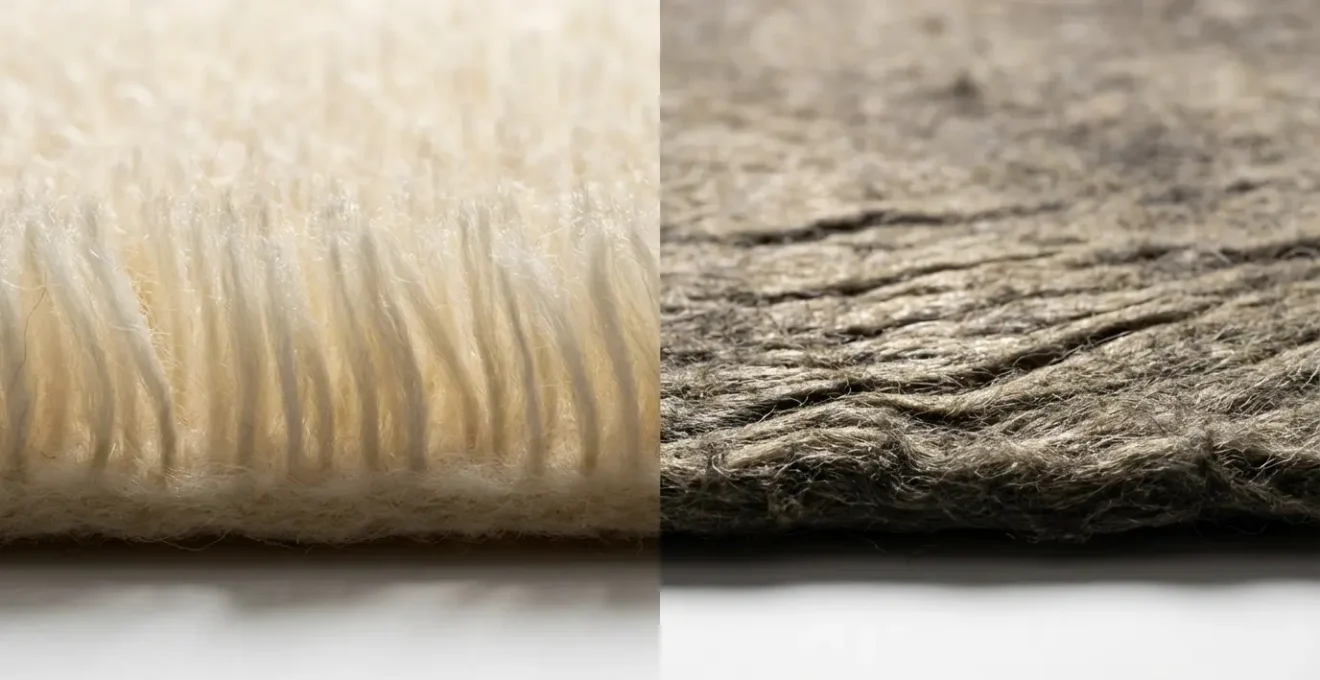
As you can see, the new fibers are lofty and create a deep pile, ready to transmit pressure evenly. The worn fibers are flattened and glazed, offering no give. It’s important to note that different materials have different lifespans; traditional woven wool blankets like Swanskin can last for many years if cared for, whereas unwoven synthetic felts will lose their shape and must be replaced more frequently. New blankets also require a “breaking-in” period, often needing to be run through the press under high pressure multiple times before they perform optimally.
Your Action Plan: Felt Health Diagnostic
- Check for permanent compression: Press your thumb firmly into the felt. A healthy felt should spring back to its original shape within two seconds. If the indent remains, the fibers have lost their resilience.
- Look for ghost images: Hold the felt up to the light. If you can see permanent impressions from the edges of previous plates, it’s a sign of over-compression and material fatigue.
- Inspect for physical damage: Check for holes or thin patches caused by moths, which create points of uneven pressure. Look for hard, lumpy spots from accidental PVA glue contamination, which will emboss into your prints.
- Examine for surface glazing: Shiny, smooth patches on the felt’s surface indicate that the texture has been completely flattened, rendering it ineffective for deep intaglio.
- Plan for replacement: If your felts exhibit two or more of these signs, they are no longer performing their function and are the likely cause of your weak prints. They must be replaced.
How to adjust the drum height for different paper weights without crushing the plate?
Calibrating the pressure of an etching press is a game of millimeters. The goal is not to apply the maximum possible force, but the *correct* amount of force for the specific combination of plate, paper, and blankets. Many printmakers are surprised to learn that etching presses can exert upwards of 6000 PSI (Pounds per Square Inch) for intaglio work. With this much force available, it is far easier to damage your materials than it is to achieve a good print through brute strength alone. An overly high pressure setting will crush the paper fibers, creating a “halo” of embossed paper around the ink and potentially even damaging the plate itself.
The key to correct calibration is finding the “zero” or “kiss” position. This is the point at which the top roller makes just enough contact to emboss the paper without applying excessive force. This baseline setting must be established and then adjusted slightly to account for different materials. A heavier, thicker paper will require the roller to be slightly higher than a thin, delicate one. The “kiss method” is a systematic way to find this even, baseline pressure.
First, ensure the press is clear. Turn both pressure handles (Tommy Bars) to the right to tighten, applying firm pressure with both hands until they are fully down. This ensures the roller is parallel to the bed. Now, turn both handles back to the left by exactly the same amount, for instance, half a turn. Place an un-inked plate on the press bed with small scraps of your printing paper at both the left and right edges, positioned where the roller will pass over them. Run the bed through the press to create a “ghost print.” Examine the embossed marks on the paper scraps. They should be clear, crisp, and identical on both sides. If one side is deeper than the other, the roller is not parallel, and you must make micro-adjustments until the embossment is perfectly even. Once you find this baseline, document the position of the handles for future reference.
Soaked Paper vs. Dry Printing: Which picks up the finest aquatint details?
For deep intaglio techniques like aquatint, the condition of the paper is just as important as the pressure of the press. Dry paper fibers are rigid and resistant. No amount of pressure can force them to conform perfectly to the microscopic texture of a finely etched plate. To pick up the ink from these shallow pits, the paper must be dampened. Soaking softens the sizing within the paper and makes the individual cotton or cellulose fibers pliable. A dampened sheet becomes docile and flexible, readily wrapping itself around every detail of the plate under pressure.
However, “damp” is not a single state. The ideal level of moisture varies significantly based on the paper type and the specific printmaking technique. Over-soaking can lead to a weak, pulpy paper that tears easily, while under-soaking will not provide the necessary flexibility. Research has shown that even short immersion times soften paper enough to require less pressure for a smoother, more solid printed image. The key is to find the right preparation method for your chosen paper to maximize its ability to capture detail without compromising its structural integrity. The following table outlines standard preparation methods for common printmaking papers.
As confirmed by a guide from paper manufacturer St Cuthberts Mill, different papers have unique properties that dictate their ideal preparation.
| Paper Type | Preparation Method | Best For | Key Benefit |
|---|---|---|---|
| Cotton Rag | Blotter dampening 2-4 hours | Deep aquatint | Cotton fibers are naturally docile and flexible |
| Japanese Gampi | Light spray misting | Delicate drypoint | Preserves burr without crushing |
| Somerset | Immersion 30-60 seconds | Multiple plates | Dimensionally stable for multi-color registration |
| Waterleaf (unsized) | Quick sponge or spray | Oil-based inks | Rapid ink absorption |
For techniques with extremely fine detail like aquatint, using a high-quality cotton rag paper prepared via blotter dampening is the standard professional practice. This method ensures the paper is uniformly damp but not saturated, giving it the perfect flexibility to be pushed into the aquatint grain. For delicate drypoint, where the fragile “burr” holds the ink, a lighter misting is preferred to avoid crushing this burr with overly soft paper. The choice of preparation is a crucial calibration step in the printing system.
The tension error that causes creases in the margin of your large prints
When printing large-format works, a frustrating and common error is the appearance of creases or wrinkles in the paper margins. This is almost always caused by a tension problem during the printing process, specifically, paper slippage. As the heavy top roller begins to move across the plate and paper, it creates a “wave” of pressure. If the leading edge of the paper is not held taut, it can be dragged or pushed slightly by the blankets as they make contact. This tiny movement causes the paper to buckle ahead of the roller, and this buckle is then pressed into a permanent crease as the roller passes over it.
This issue is a combination of mechanical and handling errors. Mechanically, it can be exacerbated if the press bed is not perfectly flat or if the blankets are bunched up. However, the most common cause is simply allowing the paper to lie flat on the inked plate before it is engaged by the roller. Printmaker Michelle Hughes highlights a straightforward solution based on her experience with similar issues. As she notes in her guide, “Printing Problems and How to Fix Them”:
I’ve had lots of printing errors: Slippage, drag and creeping, resulting in blurred or soft prints. Simply holding the paper up off the inked surface until the very last minute prevents slippage and movement.
– Michelle Hughes, Printing Problems and How to Fix Them
To prevent this, lay your dampened paper carefully over the plate, but hold the trailing edge up at a 45-degree angle. Begin running the press, and only allow the paper to make full contact with the blankets and plate an instant before the roller’s pressure point reaches it. This maintains a slight tension on the paper, preventing any buckling. If creasing persists, a more thorough mechanical check is required:
- Check for bed tipping: The press bed should not tip as it moves over the rollers. A gap should appear on the opposite side as the bed passes the halfway point, indicating the central roller is correctly set higher than the guide rollers.
- Verify roller parallelism: Use a precision straight edge to ensure the top and bottom rollers are perfectly parallel. Any deviation will cause uneven pressure.
- Test for bed warping: A warped press bed is a serious issue. Use feeler gauges at multiple points between the bed and a straight edge to detect any warping.
- Inspect blanket edges: Ensure the blankets are flat and not bunching up, as this can catch and drag the paper.
When to stop wiping the plate: the subtle line between clean highlights and wiped-out tone?
While press calibration is a mechanical process, wiping the plate is an art of touch and sight. The goal is to remove ink from the high, non-printing areas (the “highlights”) while leaving the perfect amount of ink in the etched grooves and aquatinted textures. Under-wiping leaves a muddy, heavy tone across the entire print. Over-wiping, however, is just as detrimental; it lifts ink out of the shallowest areas of the plate, resulting in weak tones and lost detail, a problem that no amount of press pressure can fix.
Knowing when to stop is one of the most difficult skills for a printmaker to learn. The surface of a properly wiped plate is not perfectly clean and shiny. It should retain a very thin, almost imperceptible film of ink, often called “plate tone.” This film is what gives an etching its characteristic atmospheric quality. Judging this film under normal overhead light is nearly impossible. The most effective method for assessing your progress is the Raking Light Technique.
To do this, position a bright, single-source light, like a desk lamp or a phone’s flashlight, so that it shines across the surface of the plate at a very low angle, parallel to the plate. Now, view the plate from a low angle on the opposite side of the light source. This raking light will catch the surface texture of the ink film. A properly wiped area will have a subtle, even sheen. Areas that are over-wiped will look completely matte, with no sheen at all, indicating all ink has been removed. Areas that are under-wiped will show streaks or heavier patches of glossy ink. Your tarlatan, the stiff cloth used for wiping, also serves as a guide. As you wipe, it picks up ink; when it starts to come away almost clean, you are approaching the final stages and should proceed with only very light pressure.
How to stretch raw linen tight enough without warping the frame?
The principle of applying even, systematic force is not limited to the printing press; it is fundamental to many studio preparation tasks, including stretching canvas or linen. Just as uneven pressure on a press can ruin a print, uneven tension when stretching a support can warp the stretcher bars, creating a frame that will not lie flat against a wall. The goal is to achieve a surface that is as tight as a drum, without torquing the wooden joints.
This is achieved not by pulling as hard as possible in one direction, but by applying balanced, opposing forces in a specific sequence. The most reliable method is the “Clock-Face Tensioning Sequence.” This technique ensures that for every pull, there is an equal and opposite pull, keeping the frame square throughout the process. Some methods even involve moistening the material before stretching. This makes the fibers more pliable and, as the linen dries on the frame, it shrinks slightly, creating a perfectly taut surface under natural tension.
The sequence begins at the center of each bar, working outwards. Start by placing your first staple in the center of the top bar (12 o’clock). Using canvas pliers, pull the linen taut and place the second staple directly opposite, in the center of the bottom bar (6 o’clock). Move to the center of the right bar (3 o’clock) for the third staple, and then directly opposite to the left bar (9 o’clock) for the fourth. You have now anchored the center points. From here, continue working outwards from the center on each bar, always alternating to the opposite side to maintain balanced tension. The corners should always be left for the very end. Stapling the corners too early is the most common cause of torqued joints and a warped frame.
Why smooth bristol board rejects soft graphite layering?
The interaction between a medium and its surface is a core principle in all art forms. In printing, we saw how paper fibers must be soft to accept ink. In drawing, a similar principle applies: the surface of the paper must have enough “tooth” to abrade the drawing tool and capture its particles. Smooth Bristol board, with its hot-pressed, plate-like finish, has an extremely minimal tooth. This is why it is excellent for ink work with fine lines, but notoriously difficult for building up deep, layered tones with soft graphite.
When you use a soft graphite pencil (like an 8B or 9B) on Bristol board, the first layer goes down smoothly. However, the minimal tooth quickly fills up with graphite particles. Any subsequent attempt to layer more graphite on top results in the new layer simply sliding over the old one, burnishing it to a shine rather than depositing more pigment. The paper lacks the physical structure to hold more material. The table below, sourced from an analysis by Jackson’s Art, illustrates the relationship between paper surface and layering capacity.
| Surface Type | Tooth Level | Best Graphite Grade | Layering Capacity |
|---|---|---|---|
| Rough Watercolor | High | HB-4B | 15+ layers |
| Cold Press | Medium | 2B-6B | 8-12 layers |
| Hot Press | Low | 4B-8B | 4-6 layers |
| Bristol Smooth | Minimal | 8B-9B | 2-3 layers without fixative |
As the data shows, Bristol Smooth has a very low layering capacity. So, how can artists achieve rich darks on this surface? The solution is to artificially create a new surface with more tooth between layers. This is done using workable fixative. After applying a light initial layer of soft graphite, a thin coat of workable fixative is sprayed over the drawing. This clear spray dries to a matte, slightly textured finish, effectively creating a new, receptive paper surface on top of the first graphite layer. After it dries, you can apply another layer of graphite, which will now adhere to the fixative. This process can be repeated multiple times, allowing for the build-up of incredibly deep, rich blacks on a surface that would otherwise reject them.
Key Takeaways
- Inconsistent print quality is most often a mechanical issue, not an ink or skill problem. Start by diagnosing your press.
- The condition of your felts is paramount. Compressed, worn blankets cannot force paper into the plate grooves, leading to weak prints.
- Precise pressure is key. Calibrate your press to find the “kiss” pressure for your materials rather than using brute force.
- Paper must be properly dampened for its fibers to become pliable enough to pick up ink from fine intaglio details.
How to Etch Copper Plates Safely Without Toxic Acid Baths?
Extending the principle of systematic control from mechanical processes to chemical ones can dramatically improve both the quality of your work and the safety of your studio. Traditional etching relies on hazardous acids like nitric acid, which require extensive ventilation and careful handling. However, modern, non-toxic mordants offer a high degree of control over the etching process without the dangerous fumes. These methods replace corrosive acids with solutions based on metallic salts, providing a safer and often more precise way to bite a copper plate.
The most popular and effective of these is the Edinburgh Etch, or Saline Sulfate Etch. This method uses a mixture of copper sulfate and sodium chloride (salt) in water. It produces a very clean, sharp, and vertical bite into the copper, which is ideal for holding ink and printing fine lines. Another common alternative is Ferric Chloride, which is less hazardous than acid but still requires care. It tends to produce a slight “undercut” on the lines as it bites sideways as well as down. For ultimate precision, electro-etching uses a low-voltage electrical current to transfer copper from the plate to a cathode in a saline solution, creating exceptionally sharp lines with perfect control over the depth of the bite.
To maximize the effectiveness of these safer methods, especially the Edinburgh Etch, a vertical etching tank is the professional standard. By suspending the plate vertically in the tank, the sediment (etched copper particles) falls away from the plate surface, ensuring the mordant is always in direct contact with the areas to be etched. This prevents “foul biting” where sediment blocks the chemical action. Gentle agitation, often provided by an aquarium bubbler, keeps the solution circulating for an even, consistent bite across the entire plate. This level of process control allows the printmaker to achieve predictable, high-quality results while eliminating the most toxic chemicals from their studio.
Applying this systematic, diagnostic mindset to your entire workflow is the definitive path to consistent, high-quality results. Begin today by evaluating each component of your printing process not as a separate step, but as an integral part of a finely calibrated system.